Integrate Receipt Bot with Sage Accounting
Integrating the Receipt Bot with Sage Accounting automates the data entry process for your sales and purchase invoices. The Receipt Bot imports suppliers, categories, VAT/GST rates, and payment methods from your Sage business, allowing it to intelligently create transactions from your purchase documents.
This article provides a detailed guide on integrating Receipt Bot with Sage Cloud.
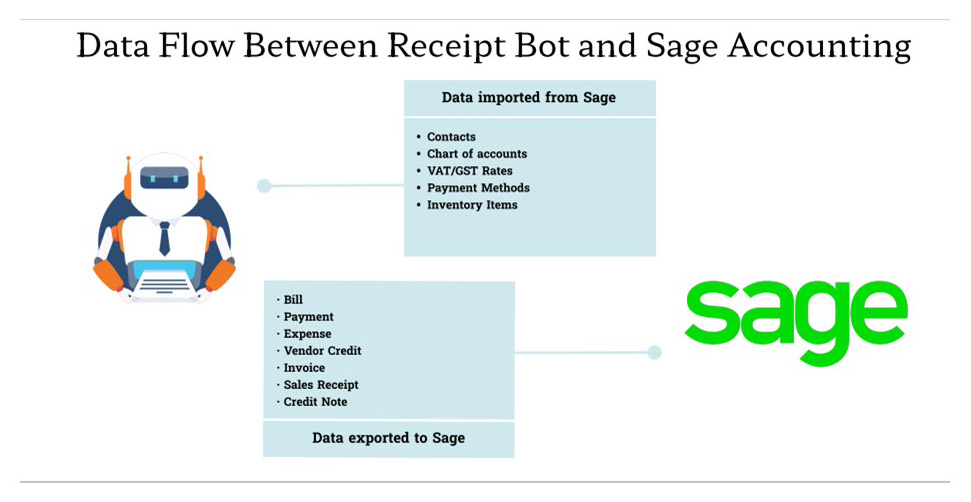
Data flow between Sage and Receipt Bot
When you connect your Sage Accounting account with Receipt Bot, data flows in both directions to keep your records accurate and up to date.
Data imported from Sage
Receipt Bot fetches the following information to ensure your documents in Receipt Bot are categorised correctly and match your Sage setup:
- Contacts/Suppliers
- Chart of accounts
- VAT/GST rates
- Payment methods
- Inventory items
Data exported to Sage
Once Receipt Bot has processed your documents, it can export:
- Bills
- Payments
- Expenses
- Vendor credits
- Invoices
- Sales receipts
- Credit notes
This two-way integration reduces manual work, avoids duplication, and keeps your Sage Accounting data in sync with your bookkeeping activity in Receipt Bot.
Steps to Integrate with Sage Cloud Accounting.
- Option 1 – Integration with Sage accounting while adding a business
- Option 2 – Integration with Sage accounting from the integration data page
Option 1 – Add new business and integrate with Sage accounting
You can add a new business or client to the Receipt Bot and connect it to Sage accounting by following the steps outlined in the article. Add a new business.
Integrating with an accounting software at the time of business creation ensures that documents processed from the beginning have the correct master data assigned to them. It also avoids several export errors.
Option 2- Using the integration data page to connect Sage Accounting
If you have already added a business in the Receipt Bot and want to integrate it with Sage accounting to export documents, then you can follow these steps:
Step 1 – Click the Business Configuration option from the business menu, and navigate to the “Integrations” page.
Step 2 – Click the ‘Connect to Sage’ button to access the Sage portal.
Step 3 – Enter your Sage credentials.
This step will be skipped if you are already signed in to Sage accounting.
Step 4 – Click the ‘Allow’ button.
Step 5 – The system will display a list of your businesses; choose the appropriate business to integrate with Receipt Bot.
Note: This step will be skipped if you do not have multiple businesses in your Sage account.
Step 6 – Click the ‘Confirm’ button.
Receipt Bot should now be integrated with Sage accounting and will fetch the master data from your accounting software.
The integration will remain valid for the next ninety days. This expiration time will be extended each time you log in to the business.
Common Issues During Sage Integration
The following is a list of common issues that can appear during the integration with Sage Accounting:
- The “Base Currency” is different between Sage and the Receipt Bot. As a result, the system prevents exports to Sage to avoid discrepancies in transaction amounts.
- An incorrect Sage business was selected during the integration.
- Large or unexpected data structures from Sage accounting can sometimes cause data synchronisation errors that require investigation.
The solution is to create a new business in the Receipt Bot. If you have already processed some documents, please contact the support team via web chat to transfer them.
Integration using the Receipt Bot Mobile Apps
Receipt Bot mobile apps do not currently allow integration with any accounting software.
Frequently Asked Questions
Q: Can I integrate multiple Sage Accounting businesses with a single Receipt Bot business?
A: You can only integrate one Sage accounting business with a single Receipt Bot business at a time.
Q: What data does Receipt Bot import from my Sage account during integration?
A: Receipt Bot imports contacts, accounting categories, VAT/GST rates, payment methods, and inventory items from your Sage account.
Q: Can I integrate Receipt Bot with Sage Accounting using the mobile app?
A: Receipt Bot mobile apps do not currently support integration with accounting software.
Q: What if I encounter issues or need assistance during the integration?
A: If you encounter any difficulties or require assistance, you can contact Receipt Bot’s customer support to help resolve any integration-related issues.