Export Documents to Xero and Find Exported Transactions
This article will explain how to export documents to Xero from Receipt Bot and verify the created transactions.
Prerequisites
Your Receipt Bot business must be connected to a Xero organisation to export transactions to Xero. Please review the following article for further details: Connect Receipt Bot to Xero.
Receipt Bot supported Transaction types for Xero
When a document is exported to Xero, Receipt Bot creates a new transaction based on the “Record As” field and attaches the uploaded file to the transaction.
Receipt Bot can create the following types of transactions in Xero for a purchase document:
- Bill, recorded as an accounts payable transaction.
- Bill & Payment, two transactions, a bill and a payment linked with the bill.
- Credit Note, as an account payable adjustment transaction.
- Spend Money as a bank payment transaction.
Receipt Bot can create the following types of transactions in Xero for a sale document:
- Invoice, recorded as an accounts receivable transaction.
- Invoice & Payment, two transactions, a sales invoice, and a payment linked with the invoice.
- Credit Note, recorded as a credit note of sales.
- Received Money, recorded as a payment received from the customer.
Export documents to Xero
You can export your documents to Xero after a detailed review or in bulk. The following are the options available in Receipt Bot to export documents:
- Option 1 – Export data with a detailed review from the document details pop-up
- Option 2 – Export data without review using the bulk export button
- Option 3 – Export data with a brief review from the invoice summary grid
Option 1 – Export data with a detailed review from the document details pop-up
To export documents from the document detail pop-up, follow these steps:
Step 1 – Navigate to the Purchase/Sale invoice page.
Step 2 – Click the document icon for the relevant invoice.
Step 3 – Review the extracted data and click the “Save & Export to Xero” button.
The selected document will be exported to Xero, and you can click the “View in Xero” button to review it.
Note: By default, the system exports the transactions in the base currency. If multi-currency is enabled in your Xero organization, you can select to export the document in the transaction currency using the “Export Currency” field.
Option 2 – Export multiple transactions using the bulk export button
You can export documents in bulk to save more time. To export multiple documents in a single click, follow these steps:
Step 1 – Navigate to the Purchase/Sale invoice page.
Step 2 – Select the checkbox for the documents you want to export.
Step 3 – Click the “Export to Xero” button on the top-right side of the page.
All the selected documents will be added to a queue and will be exported to Xero shortly. The system will also send you a notification when the items in the queue are exported.
Option 3 – Export data with a brief review from the invoice summary grid
You can review the data consistency of the processed documents from the summary grid and export them quickly using the grid export button. To export documents using the grid export button, follow these steps:
Step 1 – Navigate to the Purchase/Sale invoice page.
Step 2 – Click the export icon ![]() for the document you want to export.
for the document you want to export.
The selected document will be exported to Xero and removed from the view.
Finding exported documents in Xero
Once the documents are exported to Xero, you can easily view the transactions created in Xero by using the ‘View in Xero’ button on the details pop-up. To view a transaction in Xero, follow these steps:
Step 1 – Open the relevant business in the Xero app.
Step 2 – Open the Receipt Bot app in a new tab and navigate to the Purchase/Sale Invoice page.
Step 3 – Click the document icon for the relevant document.
Step 4 – Click the “View in Xero” button.
You will be navigated to the transaction created in Xero by Receipt Bot.
Note: Please ensure you are logged in to the relevant business in Xero before clicking the View button in Receipt Bot. The button will not link to the correct document if you are not logged in to the correct business.
If you cannot find the exported transaction using the view button, you can manually search for the documents in Xero. You can find all transactions exported as either “Bill”, “Bill & Payment”, or “Credit Note” on the “Bills to Pay” page in Xero.
For “Spend Money” transactions, navigate to the relevant bank account in Xero to locate the exported transaction.
For any document exported as an “Invoice”, “Invoice & Payment”, or “Credit Note”, it can be found on the “Invoices” page in Xero.
Editing and re-exporting documents after Export
After exporting the documents, you can edit and re-export the changes from Receipt Bot to Xero. Suppose you exported a Bill transaction in Xero and later want to record that transaction as Spend Money; you can use the Edit and Re-export button to re-export the document to Xero with the correct document type.
You can follow these steps to edit and re-export a document:
Step 1 – Navigate to the Purchase/Sale Invoices page.
Step 2 – Change the view from “New” to “Exported”.
Step 3 – Click the document icon to open the details page.
Step 4 – Click the “Edit & Re-export” button.
Step 5 – Change the “Record As” to Spend Money and assign a relevant payment method.
Step 6 – Click the “Save & Export to Xero” button.
The system will delete the bill from Xero created earlier and export a new Spend Money transaction.
Enabling auto-export of invoices
You can also enable auto-export of your invoices to Xero, allowing you to review them directly in your accounting software after uploading them to Receipt Bot.
Please read the following help article on enabling auto-export for any accounting software: Auto-export invoices to accounting software.
Resolving export-related error
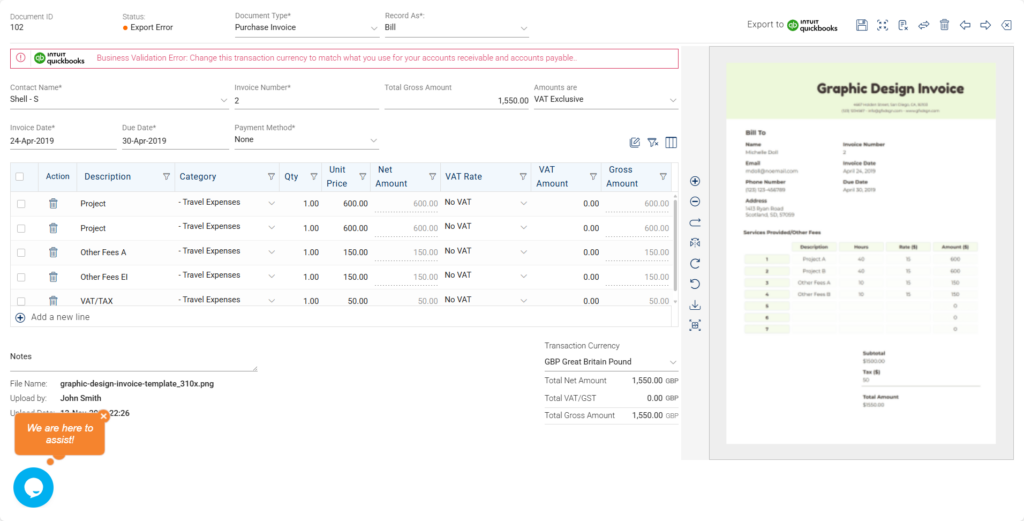
Suppose the system cannot create or update a transaction while exporting documents to Xero. In that case, it will explain the issue that must be resolved to resume the process. The following is an example of an error that may appear when exporting documents to Xero;
If you are unable to understand the issue, please contact our support team via email at hello@receipt-bot.com or through our web chat.
Frequently Asked Questions
Q: What will be the status of my exported invoices in Xero?
A: The status of your invoices will depend on the ‘Export Bill As’ setting from the Integration Data page. You can export a document to Xero as Draft, Awaiting Approval or Awaiting Payment/Authorised. By default, the document will be exported as “Awaiting Payment/Authorised.”
Q: What types of transactions can Receipt Bot create in Xero?
A: Receipt Bot can create Bills, Bill & Payment, Credit Note, Spend Money, Invoice, Invoice & Payment, Credit Note, and Received Money transactions in Xero.
Q: How many documents can I export at once with Receipt Bot?
A: You can export up to 25 documents in bulk with Receipt Bot.
Q: How do I view exported transactions in Xero?
A: You can view exported transactions in Xero by clicking the “View in Xero” button on the document details pop-up in Receipt Bot.
Q: Can I edit exported documents in Receipt Bot and export changes to Xero?
A: After exporting documents with Receipt Bot, you can re-edit and export the changes of a document to Xero.