Integrate Receipt Bot with QuickBooks Online
Integrating the Receipt Bot with QuickBooks Online automates the data entry process for your sales and purchase invoices. Receipt Bot seamlessly integrates with QuickBooks to transfer data from your accounting documents, eliminating the need for manual data entry.
This article explains how to integrate QuickBooks Online and Receipt Bot accounts.
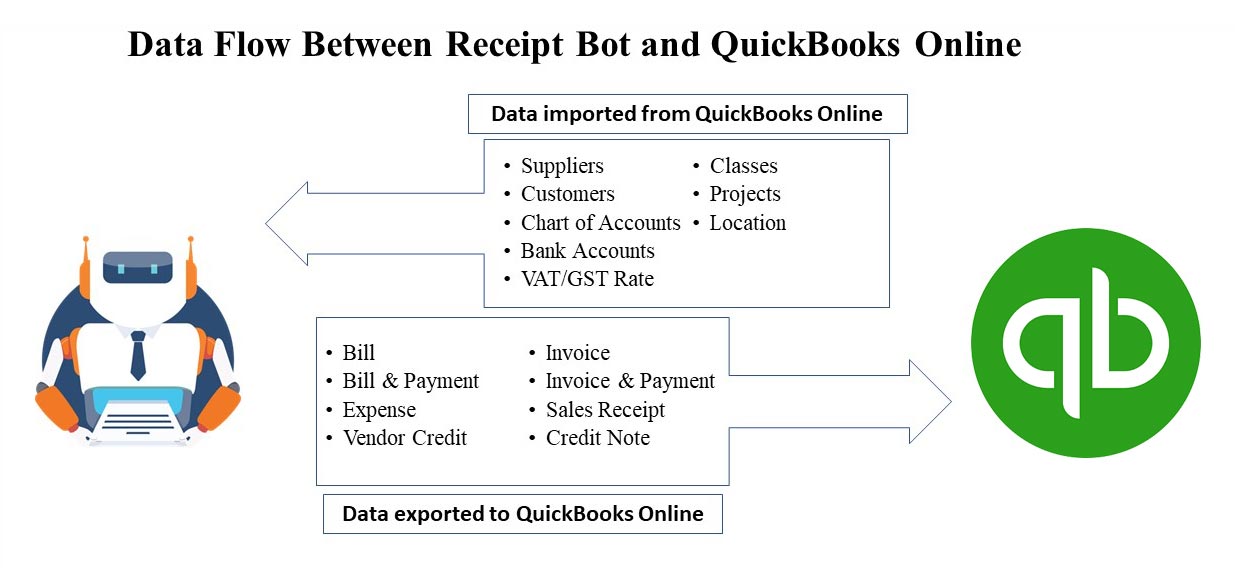
Data flow between QuickBooks Online and Receipt Bot
Steps to Integrate QuickBooks Online and Receipt Bot
Receipt Bot provides the following options for integrating your business with QuickBooks Online:
- Option 1 – Integration with QuickBooks Online while adding a business
- Option 2 – Integration with QuickBooks Online from the integration data page
Option 1 – Add new business and integrate with QuickBooks Online
This option is always recommended to ensure that the relevant COA, payment method and VAT/GST rates are used during the data extraction. Please follow the steps in the following article to integrate your business with QuickBooks Online while adding a new business in Receipt Bot. Add a new business.
Option 2 – Integration with QuickBooks Online from the Integration Data page
This option applies when you have created a business in Receipt Bot to try the data extraction process and are now ready to integrate Receipt Bot with QuickBooks Online to export documents.
Note: If you have processed your documents before integrating with QuickBooks Online, the system will reset the COA, Payment Method, and VAT/GST rate on the processed documents, as new COA, Payment Method, and VAT/GST rates are imported from QuickBooks Online. You will need to reselect these fields to export documents.
Please follow these steps to integrate your Receipt Bot account with a QuickBooks Online business;
Step 1 – Click the Business Configuration option from the business menu, and navigate to the “Integrations” page.
Step 2 – Click the ‘Connect to QuickBooks’ button
Step 3 – Enter your QuickBooks Online credentials.
This step will be skipped if you are already signed in to QuickBooks Online.
Step 4 – Select the relevant QuickBooks business to be integrated with Receipt Bot.
If you have only one business in QuickBooks Online, this step will not be applicable.
Step 5 – Click the ‘Connect’ button.
Receipt Bot should now be authorised on QuickBooks Online. It will fetch master data from QuickBooks Online, including customers, suppliers, payment methods, and more.
Upon successfully importing the data, you will receive a confirmation message.
As Receipt Bot is integrated with QuickBooks Online, any changes made to your master data in QuickBooks Online will also be automatically updated in Receipt Bot.
The QuickBooks Online integration will remain valid for ninety days. This expiry time will be increased each time you log in to the business.
Common issues during integration
Common Issues During QuickBooks Online Integration
The following is a list of common issues that can appear during the integration with QuickBooks Online:
- The “Base Currency” is different between QuickBooks Online and the Receipt Bot. As a result, the system prevents exports to QuickBooks Online to avoid discrepancies in transaction amounts.
- An incorrect QuickBooks Online business was selected during the integration.
- Large or unexpected data structures from QuickBooks Online can sometimes cause data synchronisation errors that require investigation.
The solution is to create a new business in the Receipt Bot. If you have already processed some documents, please get in touch with the support team via web chat to transfer them.
Integration using the Receipt Bot Mobile Apps
Receipt Bot mobile apps do not currently allow integration with any accounting software.
Frequently Asked Questions
Q: Can I integrate multiple QuickBooks Online businesses with Receipt Bot?
A: No, you can only integrate one QuickBooks Online business with your Receipt Bot account at a time.
Q: Can I undo the import of master data from QuickBooks Online into Receipt Bot?
A: No, once the master data is imported into Receipt Bot, it cannot be undone. You must archive the business in Receipt Bot and create a new one to perform the same steps.
Q: Why did my QuickBooks Online and Receipt Bot integration get disconnected?
A: When the integration breaks, the system typically shows a temporary disconnection message. Common reasons for this include:
– The same QuickBooks business was connected to a different Receipt Bot account, which disconnected the original integration.
– You have not logged in for over 90 days, causing the security authentication to expire.
– Your subscription has been cancelled or your account has been deleted, which results in the removal of the integration.
If your integration continues to break for any other reason, please get in touch with our support team.