Maintain your practice details & branding

As a modern accountant, you understand the importance of branding in maintaining a competitive edge in the industry. One of the most effective ways to establish and reinforce your practice branding is by using digital tools. Receipt Bot, a virtual data-entry bot for accountants, offers an efficient and innovative way to manage client data and streamline accounting workflows.

However, setting up your profile correctly on Receipt Bot is crucial to ensure that your practice branding is maintained. In this Help article, we will guide you through the steps to set up your practice branding in Receipt Bot so that you can make the most out of the data entry automation tool.

Steps to set up practice branding in Receipt Bot

Step 1 – Navigate to the Practice Management portal using the gear icon.

[imageframe lightbox=”yes” gallery_id=”” lightbox_image=”https://www.receipt-bot.com/assets/video/maintain_practice_branding/slide-1.JPG” style_type=”none” bordercolor=”” bordersize=”0px” borderradius=”0″ stylecolor=”” align=”center” link=”” linktarget=”_self” animation_type=”0″ animation_direction=”down” animation_speed=”0.1″ animation_offset=”” class=”” id=””]Navigate to the Practice Management[/imageframe]

Step 2 – Navigate to the Practice Profile page using the side menu.

[imageframe lightbox=”yes” gallery_id=”” lightbox_image=”https://www.receipt-bot.com/assets/video/maintain_practice_branding/slide-2.JPG” style_type=”none” bordercolor=”” bordersize=”0px” borderradius=”0″ stylecolor=”” align=”center” link=”” linktarget=”_self” animation_type=”0″ animation_direction=”down” animation_speed=”0.1″ animation_offset=”” class=”” id=””]Practice Profile[/imageframe]

Step 3 – Click the “Edit Field” button

[imageframe lightbox=”yes” gallery_id=”” lightbox_image=”https://www.receipt-bot.com/assets/video/maintain_practice_branding/slide-3.JPG” style_type=”none” bordercolor=”” bordersize=”0px” borderradius=”0″ stylecolor=”” align=”center” link=”” linktarget=”_self” animation_type=”0″ animation_direction=”down” animation_speed=”0.1″ animation_offset=”” class=”” id=””]Edit Field[/imageframe]

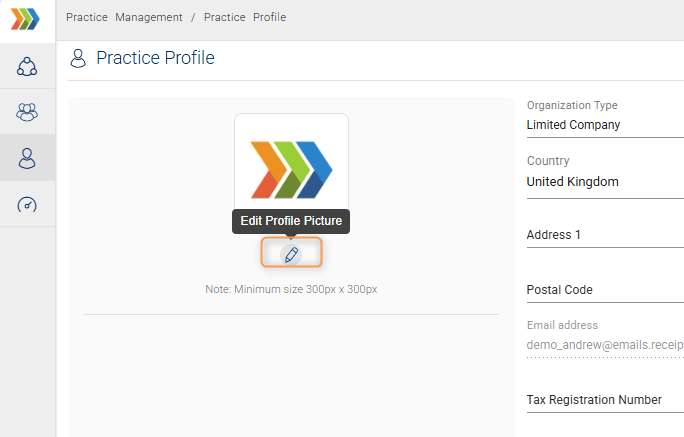
Step 4 – Enter the details about your practice/organization, like legal name, address and contact email.

[imageframe lightbox=”yes” gallery_id=”” lightbox_image=”https://www.receipt-bot.com/assets/video/maintain_practice_branding/slide-4.JPG” style_type=”none” bordercolor=”” bordersize=”0px” borderradius=”0″ stylecolor=”” align=”center” link=”” linktarget=”_self” animation_type=”0″ animation_direction=”down” animation_speed=”0.1″ animation_offset=”” class=”” id=””]practice organization[/imageframe]

Step 5 – Click the “Upload Logo” button to select your practice/firm logo.

Pro-tip: Setting up a logo promotes your organization’s digital presence to the clients and should be applied before inviting your clients.

[imageframe lightbox=”yes” gallery_id=”” lightbox_image=”https://www.receipt-bot.com/assets/video/maintain_practice_branding/slide-5.JPG” style_type=”none” bordercolor=”” bordersize=”0px” borderradius=”0″ stylecolor=”” align=”center” link=”” linktarget=”_self” animation_type=”0″ animation_direction=”down” animation_speed=”0.1″ animation_offset=”” class=”” id=””]Upload Logo[/imageframe]

Step 6 – 6. If interested in registering for the Receipt Bot accountants directory, select the following checkbox for “Allow Receipt Bot to feature you in its directory of Accountants and Bookkeepers” and briefly introduce your practice/firm.

Note: Receipt Bot plans to launch a contacts directory of accountants & bookkeepers which will be available to business owners registered with Receipt Bot and looking for accounting support. The directory will allow your accounting firm to attract additional customers and revenue.

[imageframe lightbox=”yes” gallery_id=”” lightbox_image=”https://www.receipt-bot.com/assets/video/maintain_practice_branding/slide-6.JPG” style_type=”none” bordercolor=”” bordersize=”0px” borderradius=”0″ stylecolor=”” align=”center” link=”” linktarget=”_self” animation_type=”0″ animation_direction=”down” animation_speed=”0.1″ animation_offset=”” class=”” id=””]checkbox[/imageframe]

Step 7 – Click the “Save” button to confirm changes and update in Receipt Bot.

[imageframe lightbox=”yes” gallery_id=”” lightbox_image=”https://www.receipt-bot.com/assets/video/maintain_practice_branding/slide-7.JPG” style_type=”none” bordercolor=”” bordersize=”0px” borderradius=”0″ stylecolor=”” align=”center” link=”” linktarget=”_self” animation_type=”0″ animation_direction=”down” animation_speed=”0.1″ animation_offset=”” class=”” id=””]Save[/imageframe]

Now your practice profile has been set up in Receipt Bot.

With your practice branding now set up in Receipt Bot, you can confidently onboard your clients to the platform. They can easily recognize your practice name and logo throughout the app, further reinforcing your brand and enhancing your professional image.

Limitations in Receipt Bot mobile apps

Features related to setting up a practice profile are not available in Receipt Bot mobile app.

Related

Manage users’ access to business

Go to Top