Create/update Contacts and Setup Rules for Default Master Data
After setting up a business, you should add a personalized contact list in Receipt Bot. By setting up this list, you increase the accuracy of contact identification and assignment process performed by Receipt Bot. In this article, we will cover how to update contacts and setup rules for default categories, payment methods, or VAT rates assignment on documents based on identified suppliers/customers.
We will cover the following options related to contacts management with Receipt Bot:
- Integrate with Accounting Software to keep the contacts list synced automatically.
- Add contact using the Contacts tab on the Integration Data page.
- Add contacts from the Purchase/Sales Invoices details pop-up while reviewing the extracted data.
- Import lists of contacts to Receipt Bot manually.
- Update details or archive a contact in the Receipt Bot.
Option 1: Integrate with Accounting Software to import contact lists automatically
When you integrate your Receipt Bot business with accounting software, Receipt Bot will automatically import all your contact data and update the contact list based on changes in the integrated accounting software.
You can find more details on integrating a Receipt Bot business with accounting software.
Integrate with QuickBooks Online
Option 2: Add contact using the Contacts tab on the Integration Data page.
You can follow these steps to add a contact manually in Receipt Bot:
Step 1 – Navigate to the Contacts page
[imageframe lightbox=”yes” gallery_id=”” lightbox_image=”https://www.receipt-bot.com/assets/video/create-udate-contacts-and-setup-rules-for-default-master-data/slide-1.JPG” style_type=”none” bordercolor=”” bordersize=”0px” borderradius=”0″ stylecolor=”” align=”center” link=”” linktarget=”_self” animation_type=”0″ animation_direction=”down” animation_speed=”0.1″ animation_offset=”” class=”” id=””] [/imageframe]
Step 2 – Click the “Add Contact” button
[imageframe lightbox=”yes” gallery_id=”” lightbox_image=”https://www.receipt-bot.com/assets/video/create-udate-contacts-and-setup-rules-for-default-master-data/slide-2.JPG” style_type=”none” bordercolor=”” bordersize=”0px” borderradius=”0″ stylecolor=”” align=”center” link=”” linktarget=”_self” animation_type=”0″ animation_direction=”down” animation_speed=”0.1″ animation_offset=”” class=”” id=””]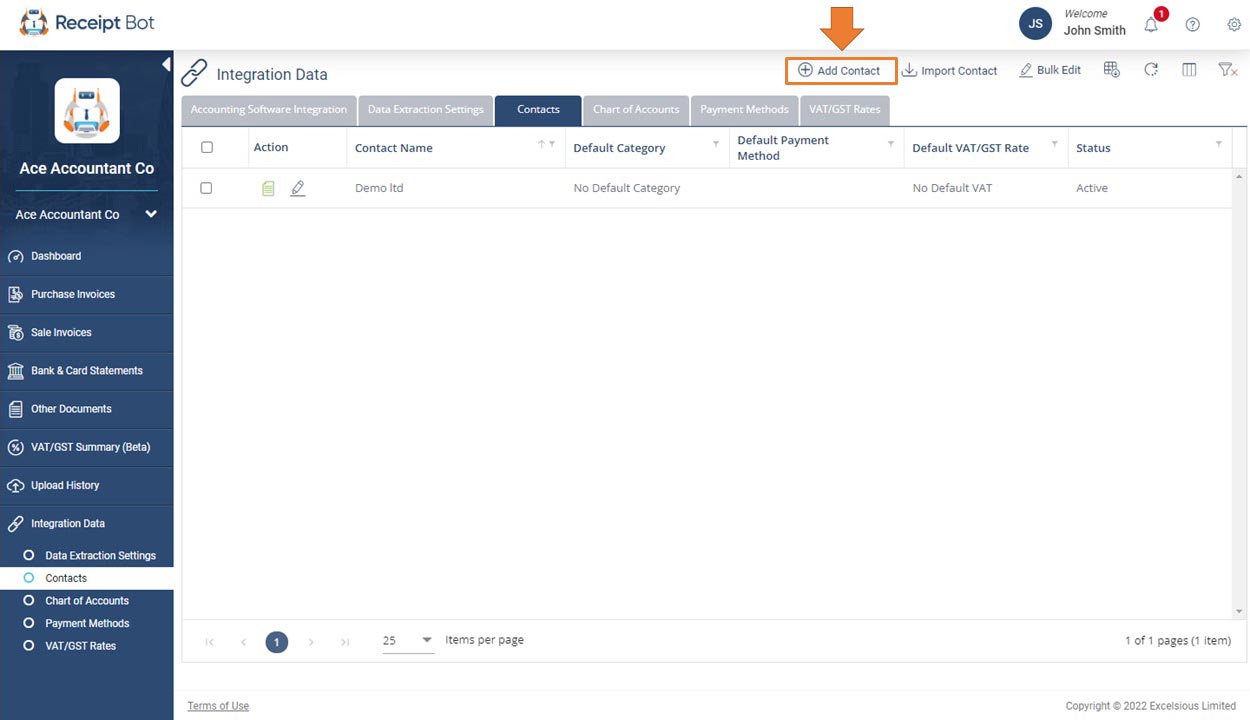 [/imageframe]
Step 3 – Provide basic information for the contact. You can provide the following details:
- Contact Name
- VAT/GST Number
- Address
- Post Code
- Country
- City
- Phone Number
- Email Address
- Transaction Currency
- IBAN
- Bank Account Number
- Sort Code
- Bank Name
[imageframe lightbox=”yes” gallery_id=”” lightbox_image=”https://www.receipt-bot.com/assets/video/create-udate-contacts-and-setup-rules-for-default-master-data/slide-3.JPG” style_type=”none” bordercolor=”” bordersize=”0px” borderradius=”0″ stylecolor=”” align=”center” link=”” linktarget=”_self” animation_type=”0″ animation_direction=”down” animation_speed=”0.1″ animation_offset=”” class=”” id=””]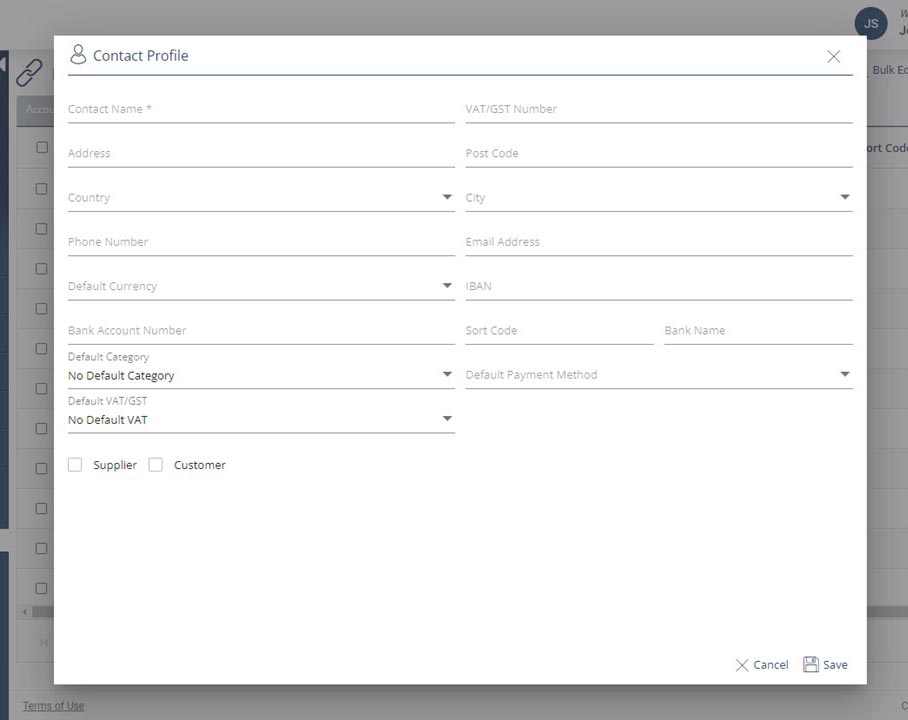 [/imageframe]
Receipt Bot can assign a document to the contact even if the name does not match completely.
If integrated with QuickBooks Online, ensure that the contact’s currency will match the document’s currency because QuickBooks Online does not accept transactions if these currencies do not match.
Step 4 – Specify the default values for the following master data fields:
- Default Purchase Category
- Default Sale Category
- Default Payment Method
- Default VAT/GST rate
[imageframe lightbox=”yes” gallery_id=”” lightbox_image=”https://www.receipt-bot.com/assets/video/create-udate-contacts-and-setup-rules-for-default-master-data/slide-4.JPG” style_type=”none” bordercolor=”” bordersize=”0px” borderradius=”0″ stylecolor=”” align=”center” link=”” linktarget=”_self” animation_type=”0″ animation_direction=”down” animation_speed=”0.1″ animation_offset=”” class=”” id=””]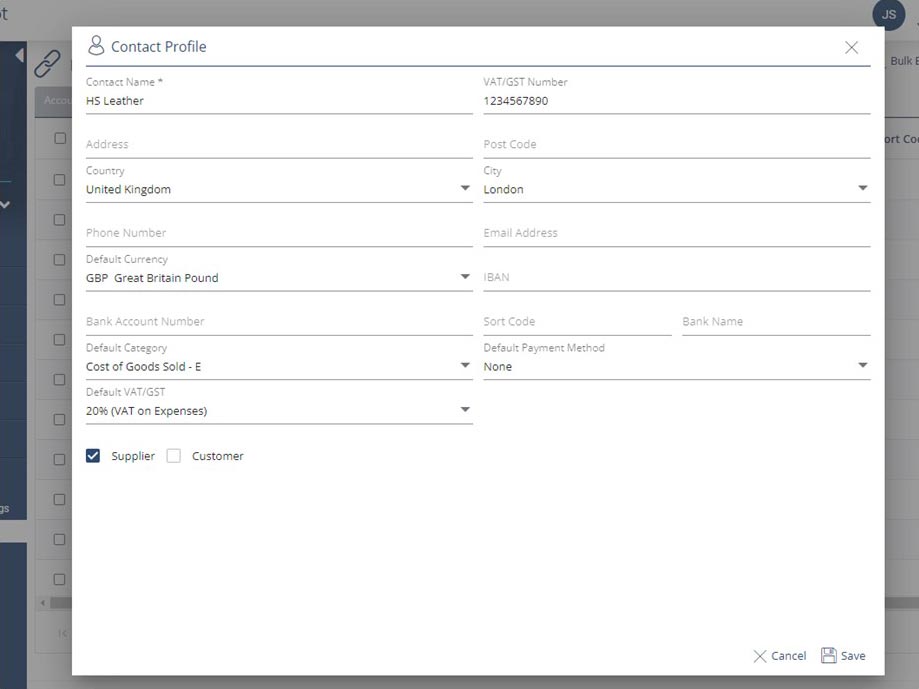 [/imageframe]
Step 5 – Click the “Save” button.
[imageframe lightbox=”yes” gallery_id=”” lightbox_image=”https://www.receipt-bot.com/assets/video/create-udate-contacts-and-setup-rules-for-default-master-data/slide-5.JPG” style_type=”none” bordercolor=”” bordersize=”0px” borderradius=”0″ stylecolor=”” align=”center” link=”” linktarget=”_self” animation_type=”0″ animation_direction=”down” animation_speed=”0.1″ animation_offset=”” class=”” id=””]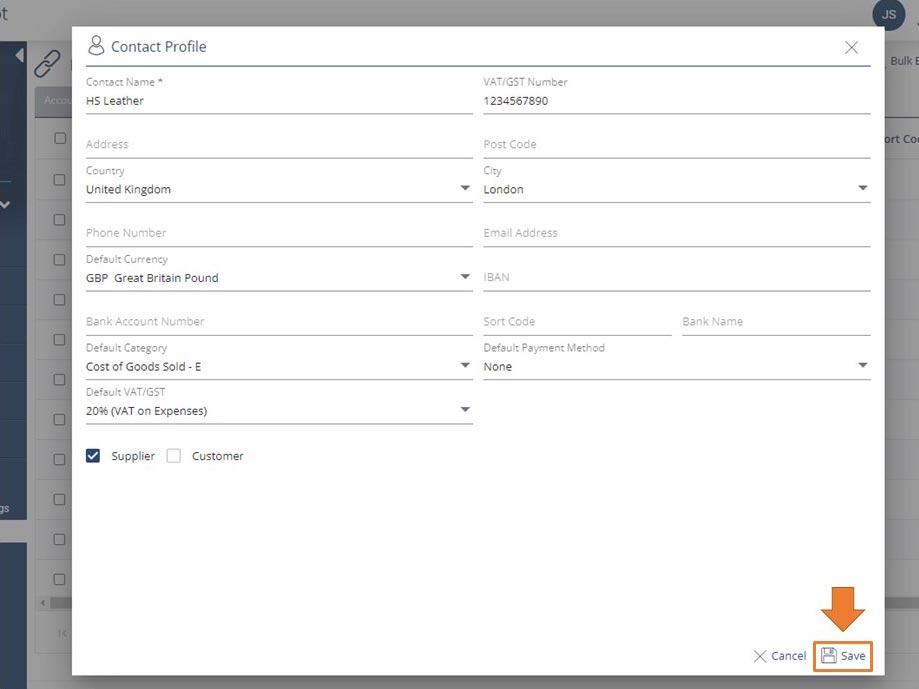 [/imageframe]
Your new contact will be added to Receipt Bot.
[imageframe lightbox=”yes” gallery_id=”” lightbox_image=”https://www.receipt-bot.com/assets/video/create-udate-contacts-and-setup-rules-for-default-master-data/slide-6.JPG” style_type=”none” bordercolor=”” bordersize=”0px” borderradius=”0″ stylecolor=”” align=”center” link=”” linktarget=”_self” animation_type=”0″ animation_direction=”down” animation_speed=”0.1″ animation_offset=”” class=”” id=””]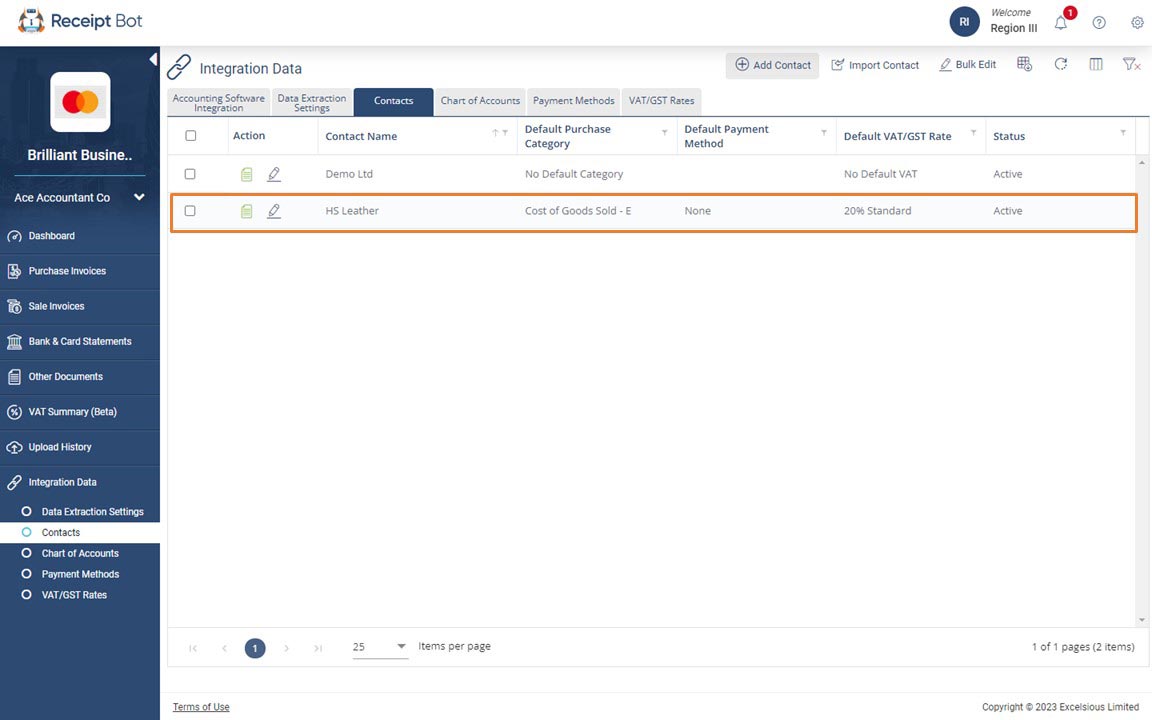 [/imageframe]
Option 3: Add contacts from the Purchase/Sales Invoices details pop-up while reviewing the extracted data.
Receipt Bot can automatically extract the supplier from the document. If the system fails to extract the supplier name, it will add a placeholder contact named “Miscellaneous Supplier.” You must manually add the contact after reviewing the document.
You can add new contacts from the Purchase/Sales Invoices Details pop-up in Receipt Bot. To add a contact from the details pop-up, please follow these steps;
Step 1 – Navigate to the “Purchase Invoices” page from the business menu.
[imageframe lightbox=”yes” gallery_id=”” lightbox_image=”https://www.receipt-bot.com/assets/video/create-udate-contacts-and-setup-rules-for-default-master-data/slide-7.JPG” style_type=”none” bordercolor=”” bordersize=”0px” borderradius=”0″ stylecolor=”” align=”center” link=”” linktarget=”_self” animation_type=”0″ animation_direction=”down” animation_speed=”0.1″ animation_offset=”” class=”” id=””]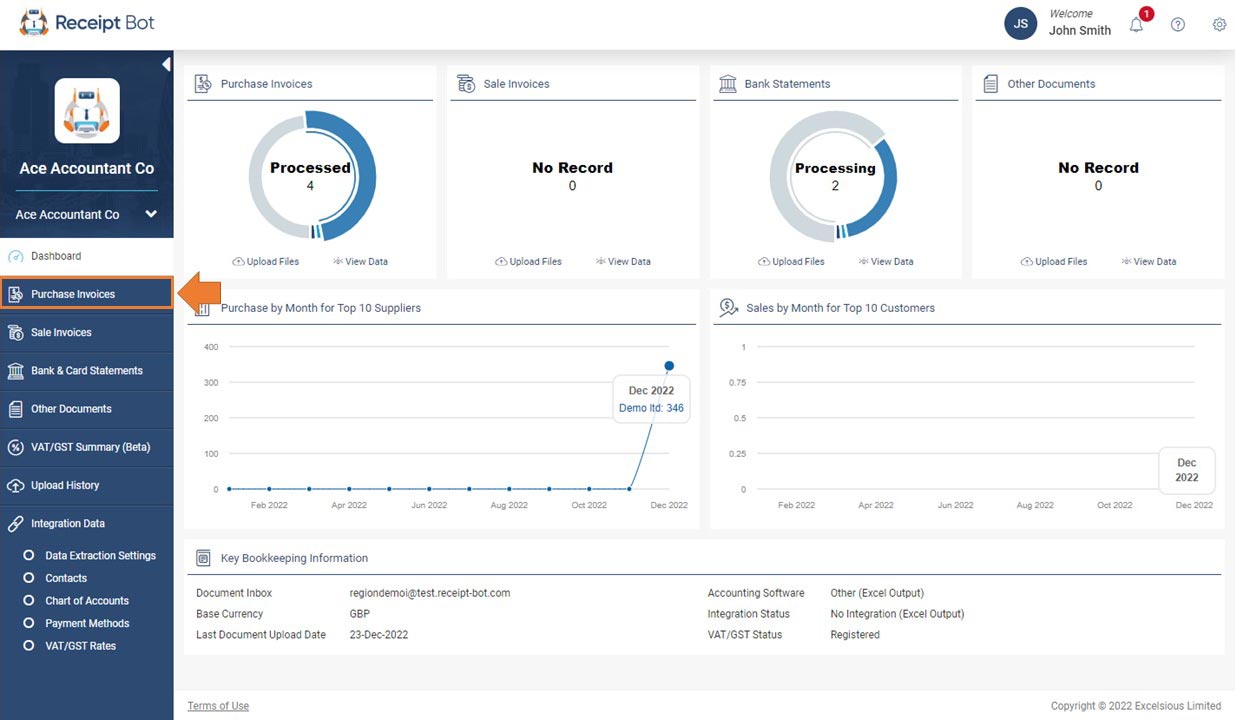 [/imageframe]
Step 2 – Click the document icon for the relevant invoice.
[imageframe lightbox=”yes” gallery_id=”” lightbox_image=”https://www.receipt-bot.com/assets/video/create-udate-contacts-and-setup-rules-for-default-master-data/slide-8.JPG” style_type=”none” bordercolor=”” bordersize=”0px” borderradius=”0″ stylecolor=”” align=”center” link=”” linktarget=”_self” animation_type=”0″ animation_direction=”down” animation_speed=”0.1″ animation_offset=”” class=”” id=””]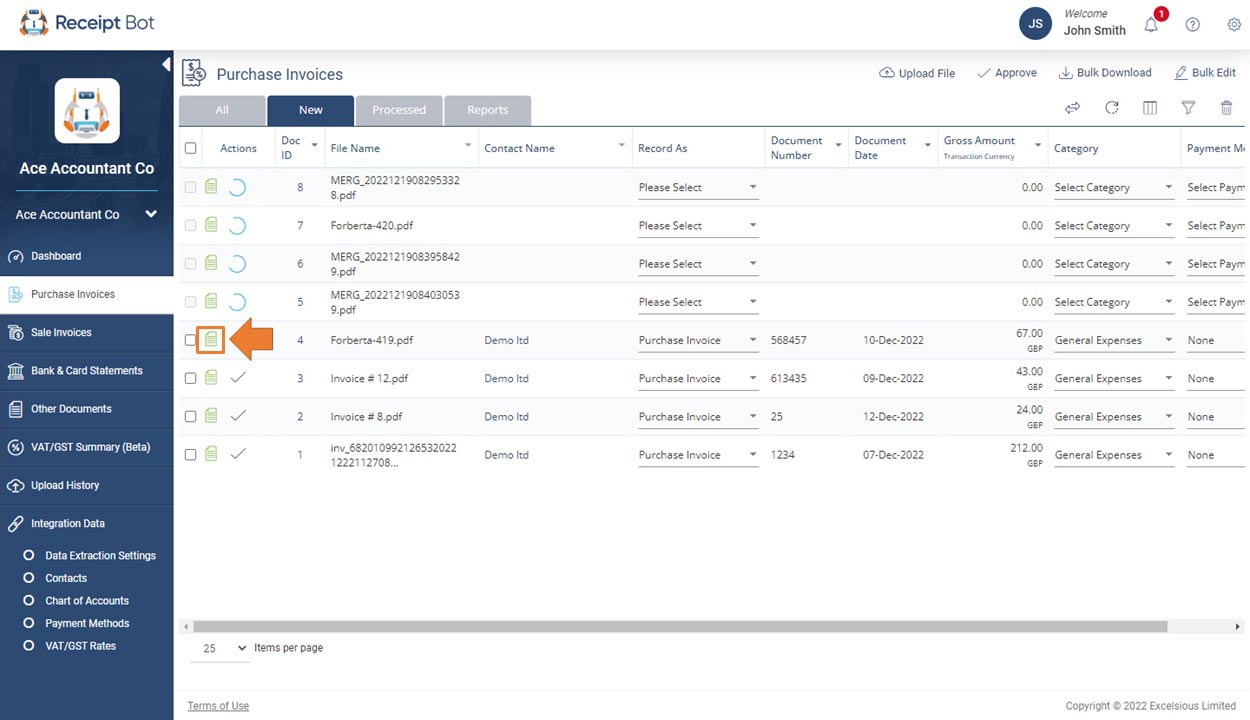 [/imageframe]
Step 3 – Enter the supplier name in the Contact field.
[imageframe lightbox=”yes” gallery_id=”” lightbox_image=”https://www.receipt-bot.com/assets/video/create-udate-contacts-and-setup-rules-for-default-master-data/slide-9.JPG” style_type=”none” bordercolor=”” bordersize=”0px” borderradius=”0″ stylecolor=”” align=”center” link=”” linktarget=”_self” animation_type=”0″ animation_direction=”down” animation_speed=”0.1″ animation_offset=”” class=”” id=””]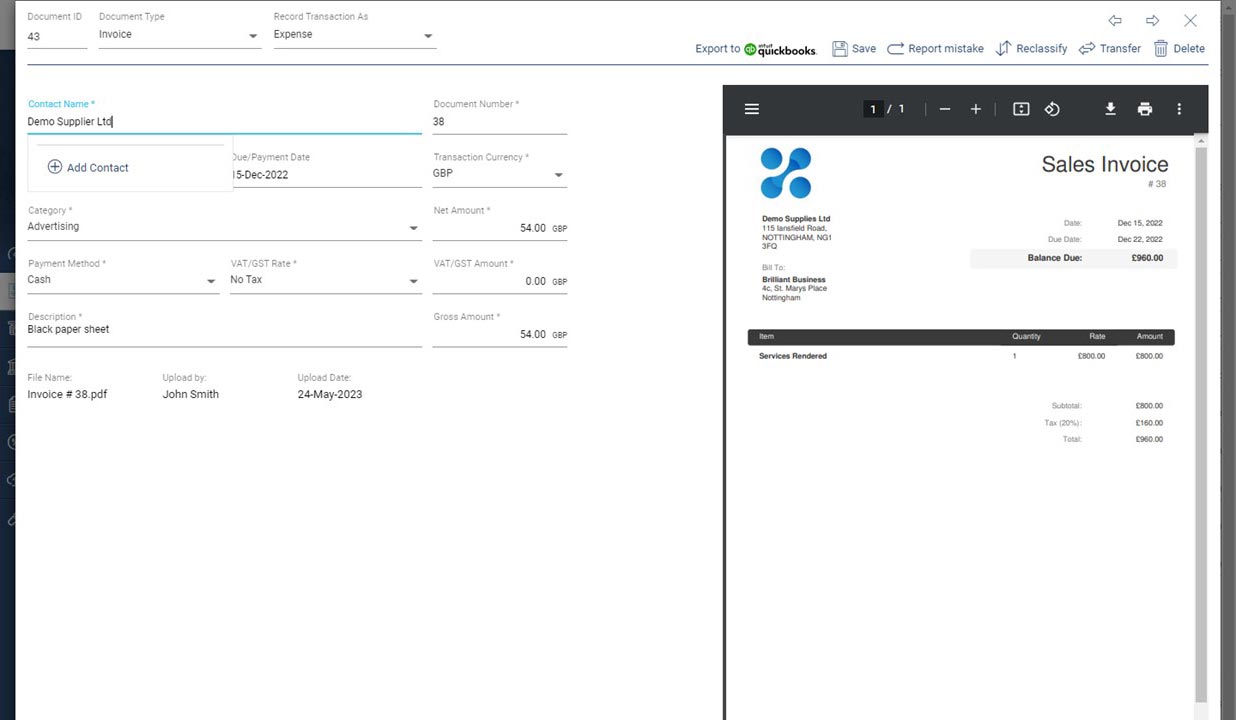 [/imageframe]
Step 4 – Click the “Add Contact” button.
[imageframe lightbox=”yes” gallery_id=”” lightbox_image=”https://www.receipt-bot.com/assets/video/create-udate-contacts-and-setup-rules-for-default-master-data/slide-10.JPG” style_type=”none” bordercolor=”” bordersize=”0px” borderradius=”0″ stylecolor=”” align=”center” link=”” linktarget=”_self” animation_type=”0″ animation_direction=”down” animation_speed=”0.1″ animation_offset=”” class=”” id=””]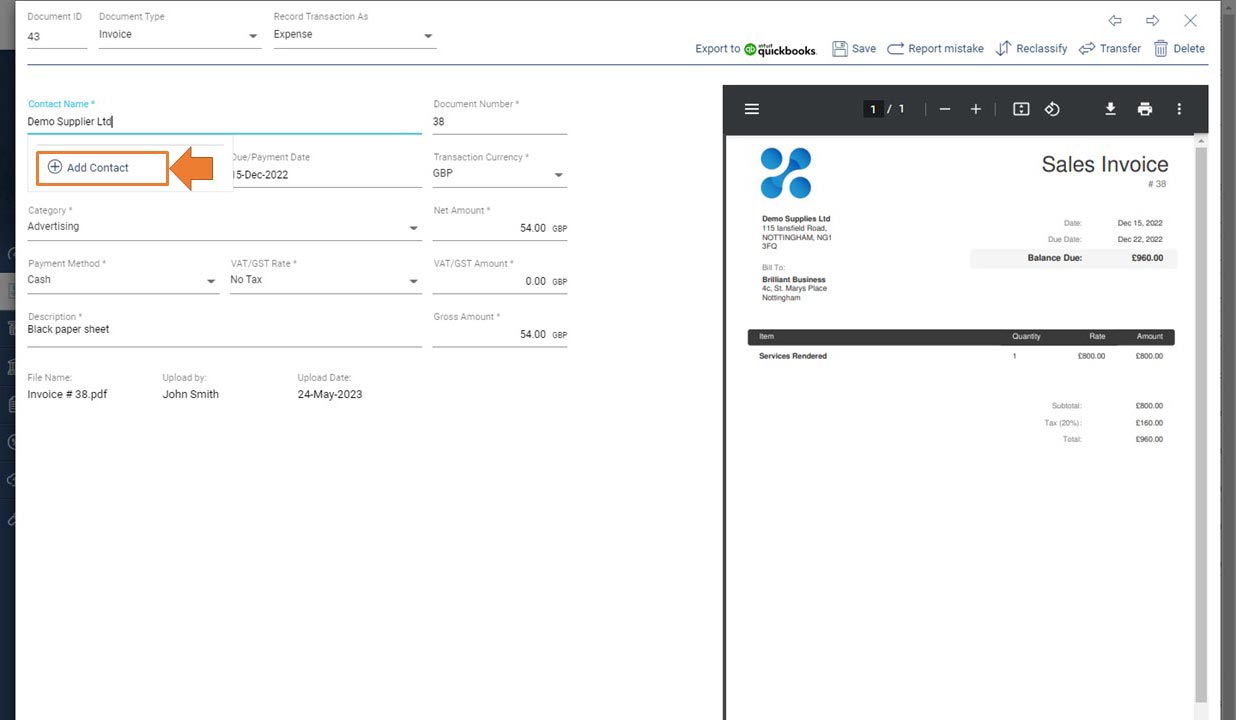 [/imageframe]
Your new contact will be added, and the system will show a success message.
Creating a contact from the purchase invoice page will mark it as a supplier. You can also create customers from the sale invoice details pop-up.
Option 4: Import lists of contacts to Receipt Bot manually.
You can also import your contacts list CSV file to Receipt Bot, which you might maintain in another tool.
You can follow these steps to import your Contacts to Receipt-Bot:
Step 1 – Navigate to the Contacts page from the business menu.
[imageframe lightbox=”yes” gallery_id=”” lightbox_image=”https://www.receipt-bot.com/assets/video/create-udate-contacts-and-setup-rules-for-default-master-data/slide-11.JPG” style_type=”none” bordercolor=”” bordersize=”0px” borderradius=”0″ stylecolor=”” align=”center” link=”” linktarget=”_self” animation_type=”0″ animation_direction=”down” animation_speed=”0.1″ animation_offset=”” class=”” id=””]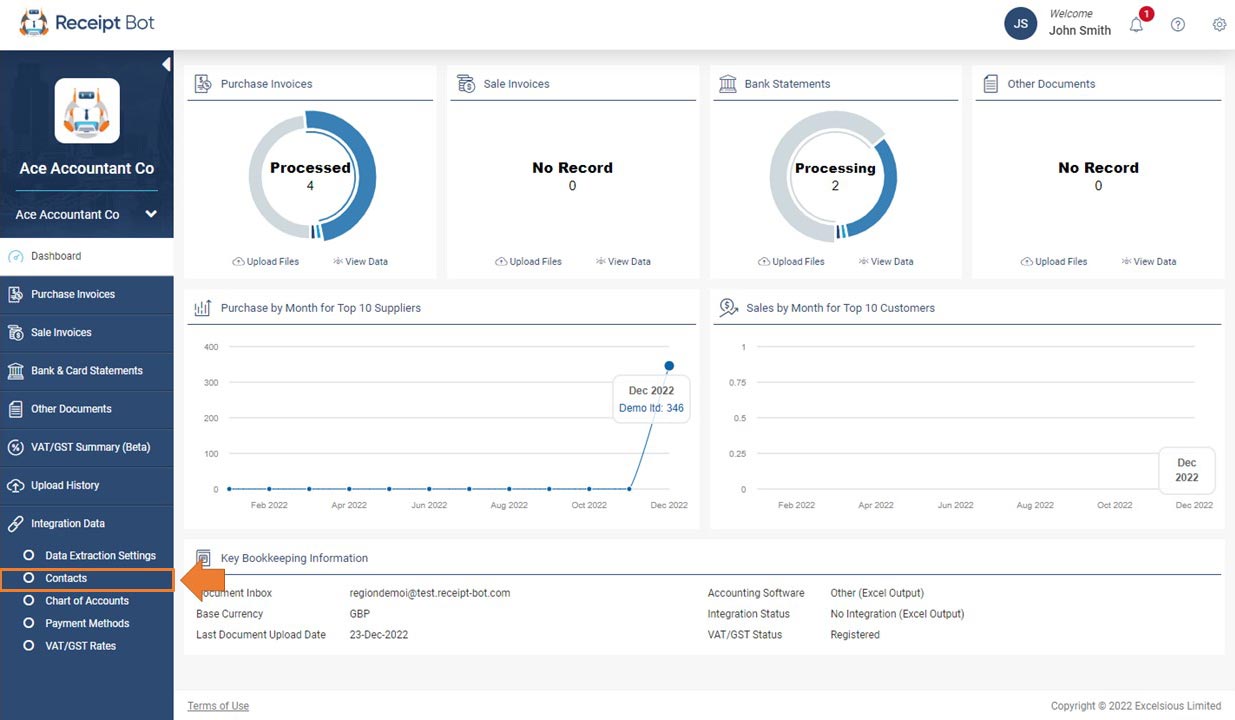 [/imageframe]
Step 2 – Click the ‘Import Contact’ button.
[imageframe lightbox=”yes” gallery_id=”” lightbox_image=”https://www.receipt-bot.com/assets/video/create-udate-contacts-and-setup-rules-for-default-master-data/slide-12.JPG” style_type=”none” bordercolor=”” bordersize=”0px” borderradius=”0″ stylecolor=”” align=”center” link=”” linktarget=”_self” animation_type=”0″ animation_direction=”down” animation_speed=”0.1″ animation_offset=”” class=”” id=””]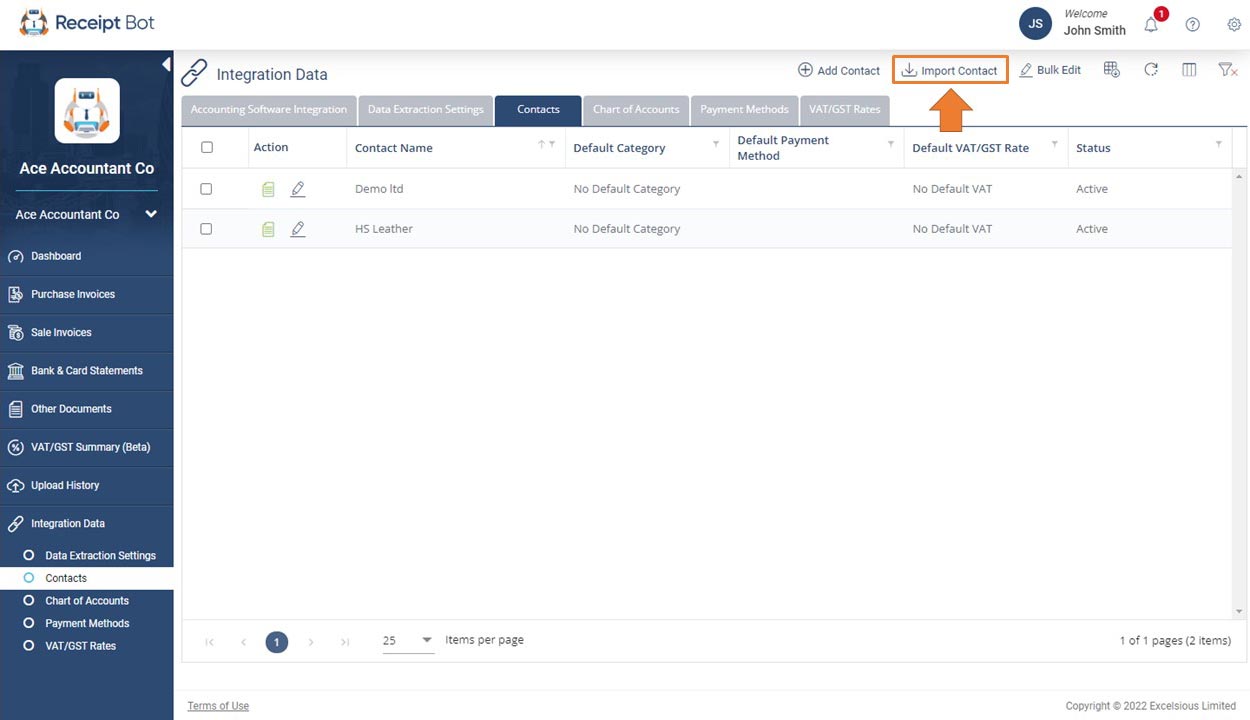 [/imageframe]
Step 3 – Download the “Contact Import Template.”
[imageframe lightbox=”yes” gallery_id=”” lightbox_image=”https://www.receipt-bot.com/assets/video/create-udate-contacts-and-setup-rules-for-default-master-data/slide-13.JPG” style_type=”none” bordercolor=”” bordersize=”0px” borderradius=”0″ stylecolor=”” align=”center” link=”” linktarget=”_self” animation_type=”0″ animation_direction=”down” animation_speed=”0.1″ animation_offset=”” class=”” id=””]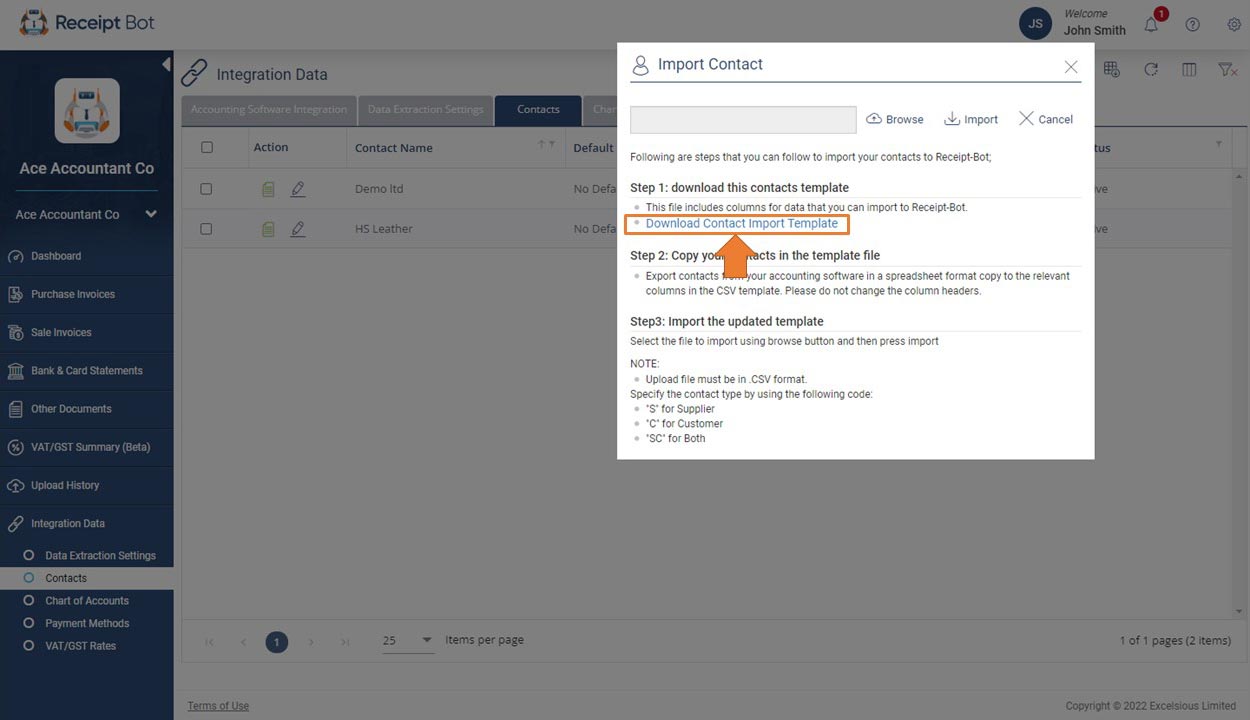 [/imageframe]
Step 4 – Format your data according to the contact import template of Receipt Bot.
The following data can be provided for contacts using the template;
- Contact Unique Identifier
- *Contact Name
- VAT number
- Bank Name
- Contact Number
- Bank Account Number
- Sort Code
- Post Code
- Address
- *Contact type
- IBAN
- Default Payment method
- Default Category
- Default VAT/GST
- Default Currency
- Country
- City
[imageframe lightbox=”yes” gallery_id=”” lightbox_image=”https://www.receipt-bot.com/assets/video/create-udate-contacts-and-setup-rules-for-default-master-data/slide-14.JPG” style_type=”none” bordercolor=”” bordersize=”0px” borderradius=”0″ stylecolor=”” align=”center” link=”” linktarget=”_self” animation_type=”0″ animation_direction=”down” animation_speed=”0.1″ animation_offset=”” class=”” id=””] [/imageframe]
Contact name and Contact Type are mandatory fields.
When you download your processed purchase/sale invoices, Receipt Bot will provide this unique identifier in the CSV file.
Step 5 – Specify the contact type for each contact.
The contact type refers to the relationship type of a contact. It is used to differentiate between customers and suppliers.
In the “Contact Type” field, you can enter the following codes to specify the contact type.
- Use “S” to specify a supplier.
- Use “C” to specify a customer.
- Use “SC” to specify that a contact is both supplier and a customer
Step 6 – Click the ‘Browse’ button and select the template with data.
[imageframe lightbox=”yes” gallery_id=”” lightbox_image=”https://www.receipt-bot.com/assets/video/create-udate-contacts-and-setup-rules-for-default-master-data/slide-15.JPG” style_type=”none” bordercolor=”” bordersize=”0px” borderradius=”0″ stylecolor=”” align=”center” link=”” linktarget=”_self” animation_type=”0″ animation_direction=”down” animation_speed=”0.1″ animation_offset=”” class=”” id=””]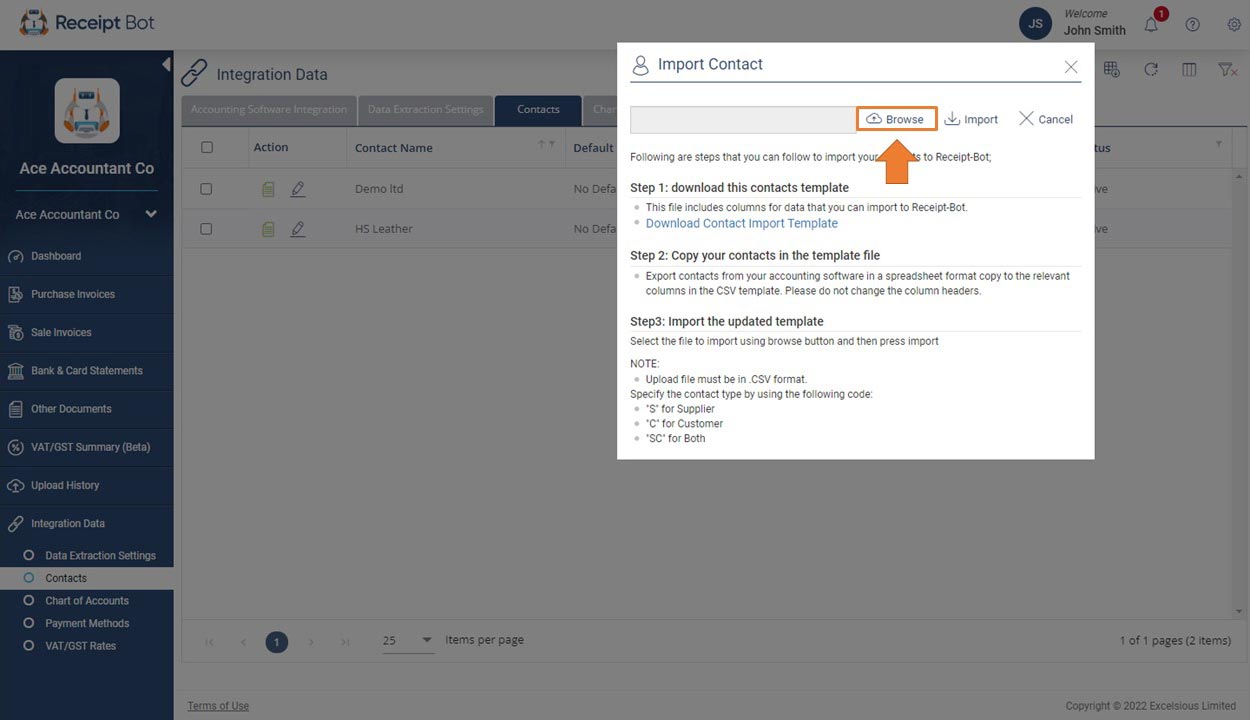 [/imageframe]
The system will check the selected file and perform the following checks on it:
- No mandatory field should be missing for any contact.
- No duplicate values are allowed in the “Contact Unique Identifier” and “Contact Name.” Receipt Bot will ignore any records that are found to be duplicated.
If any error appears, the system will show an error with the relevant row number in the CSV file. You will need to resolve those errors to import the contacts.
[imageframe lightbox=”yes” gallery_id=”” lightbox_image=”https://www.receipt-bot.com/assets/video/create-udate-contacts-and-setup-rules-for-default-master-data/slide-16.JPG” style_type=”none” bordercolor=”” bordersize=”0px” borderradius=”0″ stylecolor=”” align=”center” link=”” linktarget=”_self” animation_type=”0″ animation_direction=”down” animation_speed=”0.1″ animation_offset=”” class=”” id=””]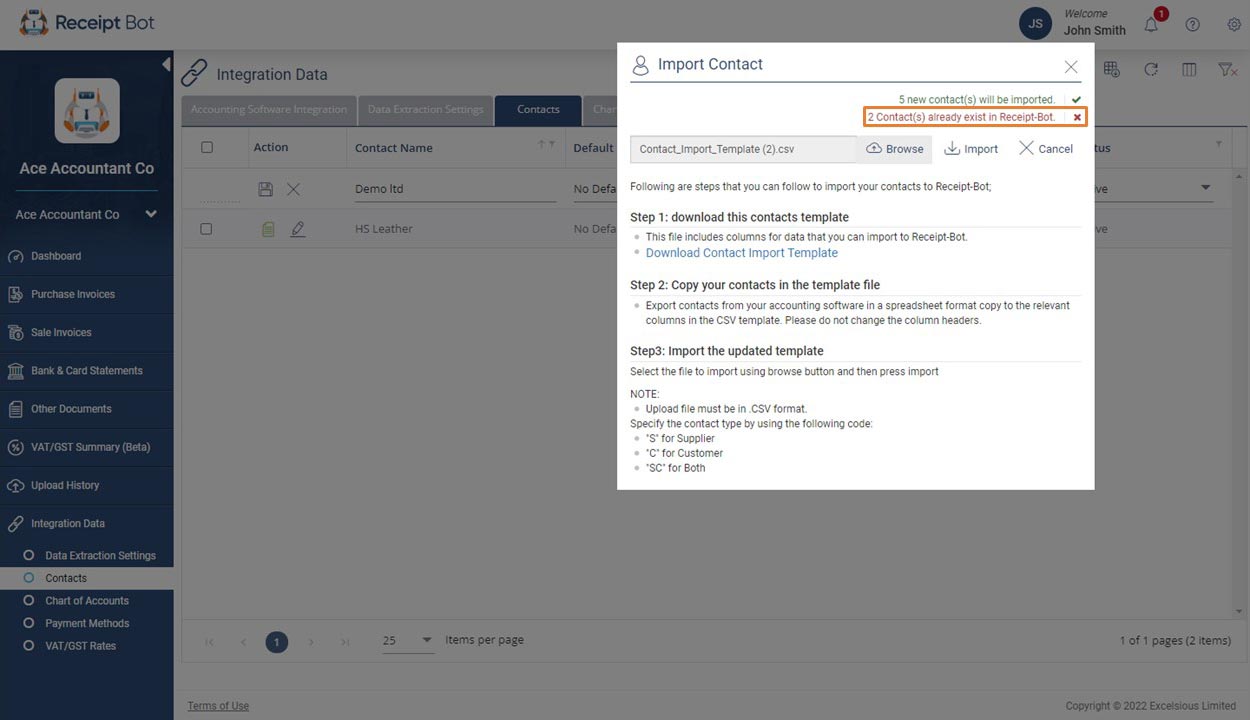 [/imageframe]
If no validation errors appear, the system will display the count of new contacts created or duplicate contacts ignored.
[imageframe lightbox=”yes” gallery_id=”” lightbox_image=”https://www.receipt-bot.com/assets/video/create-udate-contacts-and-setup-rules-for-default-master-data/slide-17.JPG” style_type=”none” bordercolor=”” bordersize=”0px” borderradius=”0″ stylecolor=”” align=”center” link=”” linktarget=”_self” animation_type=”0″ animation_direction=”down” animation_speed=”0.1″ animation_offset=”” class=”” id=””]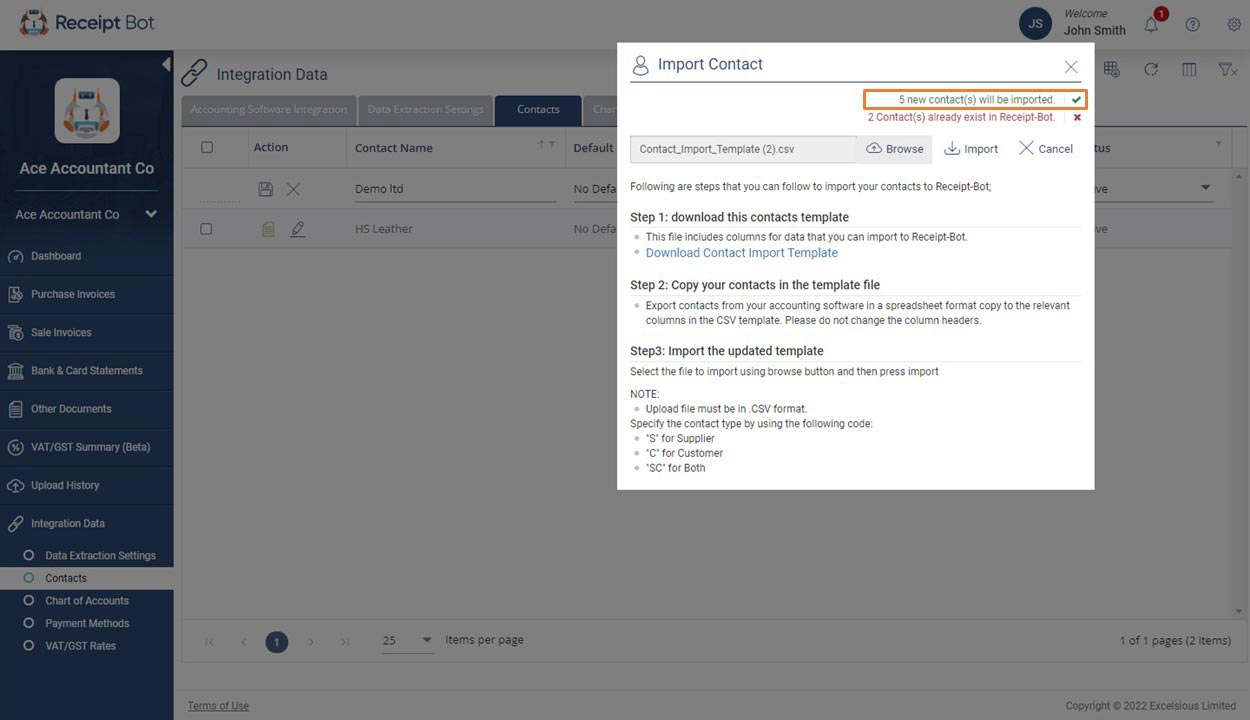 [/imageframe]
Step 7 – Click the ‘Import’ button.
[imageframe lightbox=”yes” gallery_id=”” lightbox_image=”https://www.receipt-bot.com/assets/video/create-udate-contacts-and-setup-rules-for-default-master-data/slide-18.JPG” style_type=”none” bordercolor=”” bordersize=”0px” borderradius=”0″ stylecolor=”” align=”center” link=”” linktarget=”_self” animation_type=”0″ animation_direction=”down” animation_speed=”0.1″ animation_offset=”” class=”” id=””]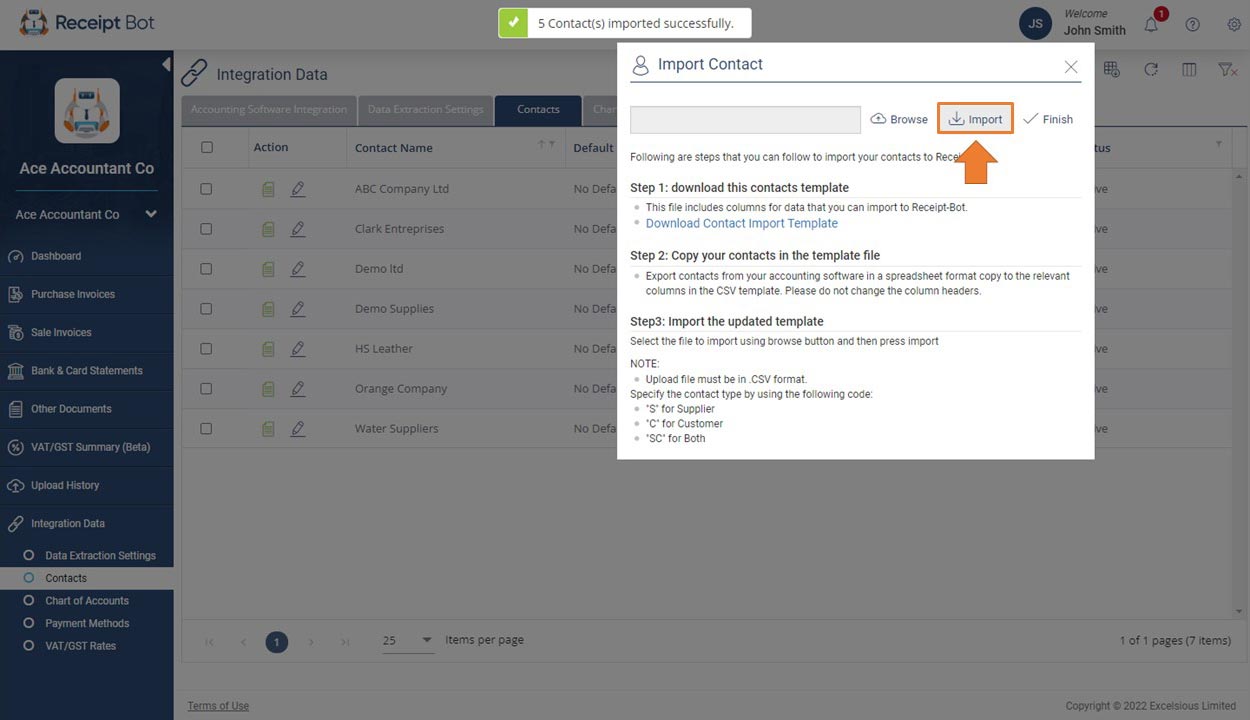 [/imageframe]
Step 8 – Click the “Finish” button to complete the process.
[imageframe lightbox=”yes” gallery_id=”” lightbox_image=”https://www.receipt-bot.com/assets/video/create-udate-contacts-and-setup-rules-for-default-master-data/slide-19.JPG” style_type=”none” bordercolor=”” bordersize=”0px” borderradius=”0″ stylecolor=”” align=”center” link=”” linktarget=”_self” animation_type=”0″ animation_direction=”down” animation_speed=”0.1″ animation_offset=”” class=”” id=””]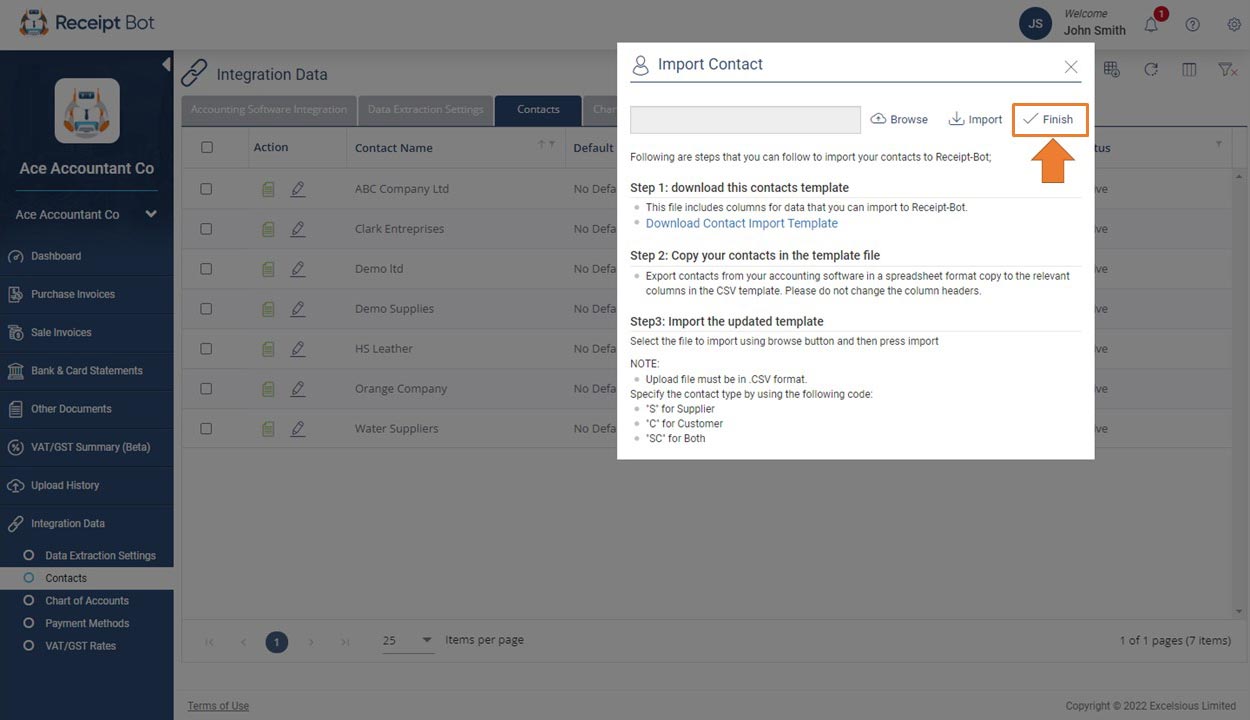 [/imageframe]
Your contact list should be imported to Receipt Bot, and the contacts will now be available on the purchase or sale invoices page.
[imageframe lightbox=”yes” gallery_id=”” lightbox_image=”https://www.receipt-bot.com/assets/video/create-udate-contacts-and-setup-rules-for-default-master-data/slide-20.JPG” style_type=”none” bordercolor=”” bordersize=”0px” borderradius=”0″ stylecolor=”” align=”center” link=”” linktarget=”_self” animation_type=”0″ animation_direction=”down” animation_speed=”0.1″ animation_offset=”” class=”” id=””]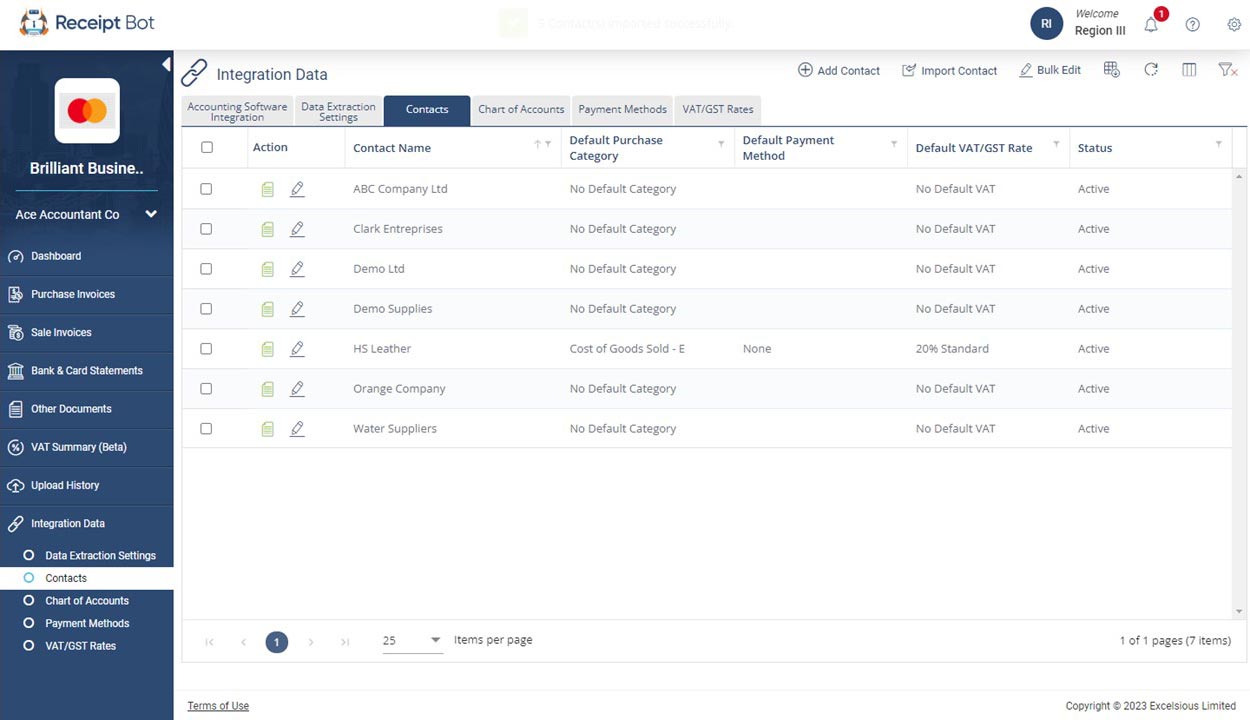 [/imageframe]
Option 5: Update details or archive a contact in the Receipt Bot.
You can update your contact details or archive unnecessary contacts so they are not assigned to invoices by Receipt Bot.
You can follow these steps to update contact and setup rules for default master data:
Step 1 – Navigate to the Contacts page from the business menu.
[imageframe lightbox=”yes” gallery_id=”” lightbox_image=”https://www.receipt-bot.com/assets/video/create-udate-contacts-and-setup-rules-for-default-master-data/slide-1.JPG” style_type=”none” bordercolor=”” bordersize=”0px” borderradius=”0″ stylecolor=”” align=”center” link=”” linktarget=”_self” animation_type=”0″ animation_direction=”down” animation_speed=”0.1″ animation_offset=”” class=”” id=””][/imageframe]
Step 2 – Click the ![]() icon for the contacts to be edited.
icon for the contacts to be edited.
[imageframe lightbox=”yes” gallery_id=”” lightbox_image=”https://www.receipt-bot.com/assets/video/create-udate-contacts-and-setup-rules-for-default-master-data/slide-21.JPG” style_type=”none” bordercolor=”” bordersize=”0px” borderradius=”0″ stylecolor=”” align=”center” link=”” linktarget=”_self” animation_type=”0″ animation_direction=”down” animation_speed=”0.1″ animation_offset=”” class=”” id=””]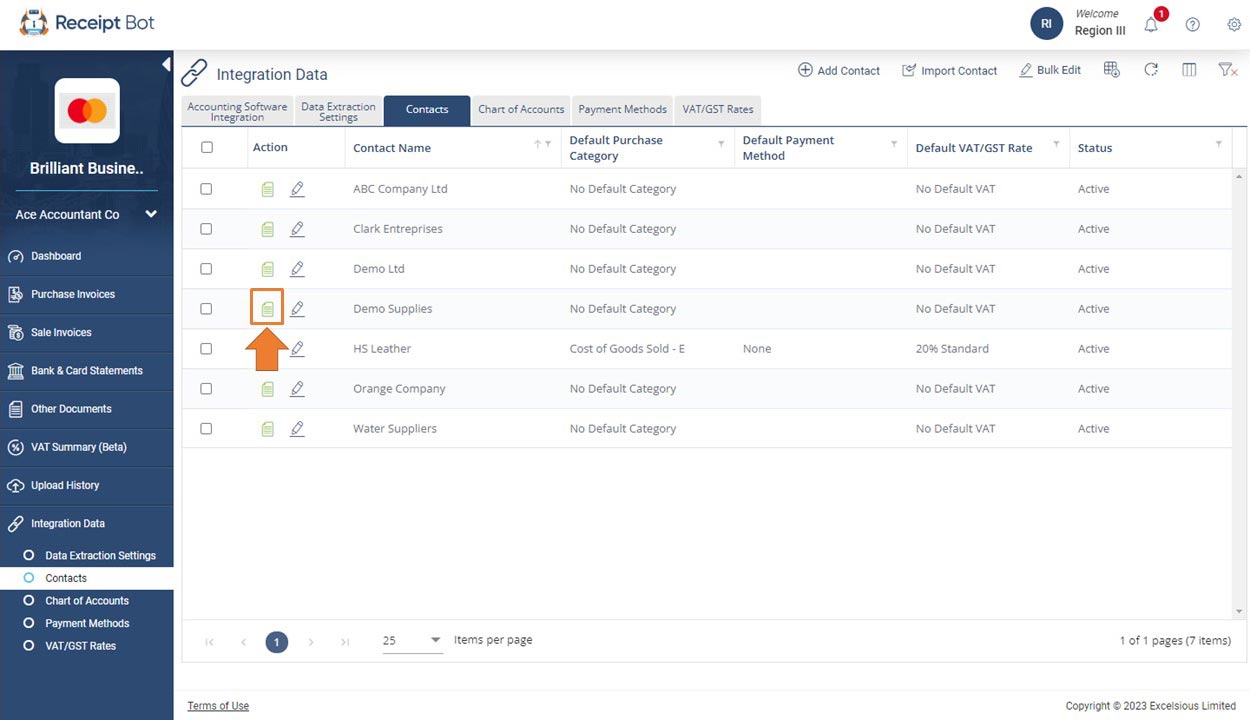 [/imageframe]
Step 3 – Update relevant details for the contact, like Status, Default Category, etc.
[imageframe lightbox=”yes” gallery_id=”” lightbox_image=”https://www.receipt-bot.com/assets/video/create-udate-contacts-and-setup-rules-for-default-master-data/slide-22.JPG” style_type=”none” bordercolor=”” bordersize=”0px” borderradius=”0″ stylecolor=”” align=”center” link=”” linktarget=”_self” animation_type=”0″ animation_direction=”down” animation_speed=”0.1″ animation_offset=”” class=”” id=””]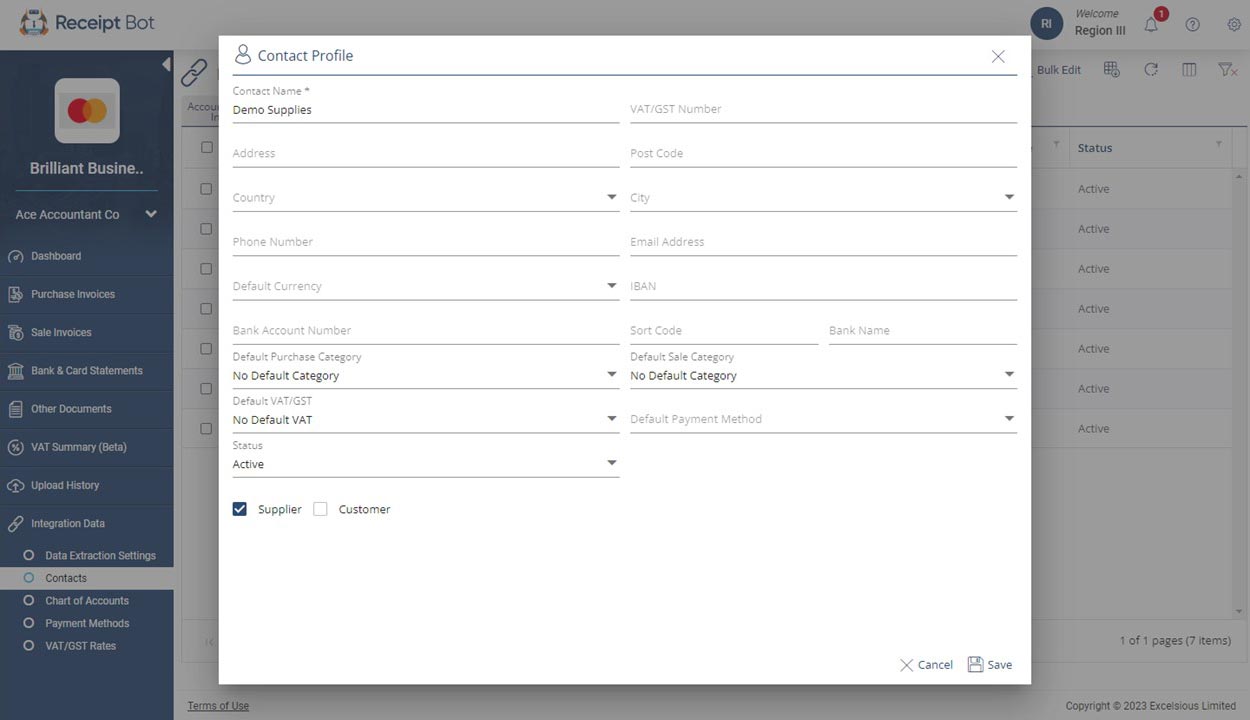 [/imageframe]
Step 4 – Click the “Save” button.
[imageframe lightbox=”yes” gallery_id=”” lightbox_image=”https://www.receipt-bot.com/assets/video/create-udate-contacts-and-setup-rules-for-default-master-data/slide-23.JPG” style_type=”none” bordercolor=”” bordersize=”0px” borderradius=”0″ stylecolor=”” align=”center” link=”” linktarget=”_self” animation_type=”0″ animation_direction=”down” animation_speed=”0.1″ animation_offset=”” class=”” id=””]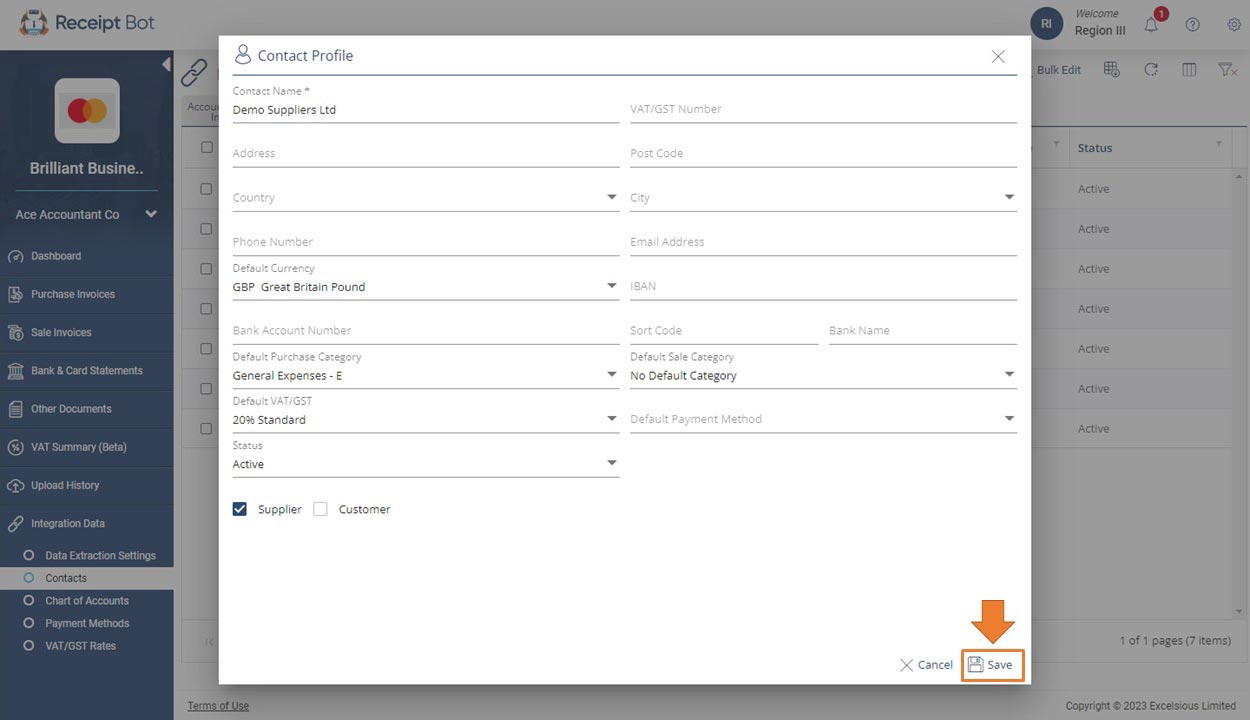 [/imageframe]
Your contact details are updated in the Receipt Bot.
[imageframe lightbox=”yes” gallery_id=”” lightbox_image=”https://www.receipt-bot.com/assets/video/create-udate-contacts-and-setup-rules-for-default-master-data/slide-24.JPG” style_type=”none” bordercolor=”” bordersize=”0px” borderradius=”0″ stylecolor=”” align=”center” link=”” linktarget=”_self” animation_type=”0″ animation_direction=”down” animation_speed=”0.1″ animation_offset=”” class=”” id=””] [/imageframe]
Next Step
As you have set up your contact’s data in Receipt Bot, the next step can be importing your chart of accounts in Receipt Bot so that the relevant category gets linked to processed documents. Please refer to the following article: Create and update accounting categories in Receipt Bot