Create and update accounting categories
Receipt Bot revolutionizes the categorization of your expenses, eliminating countless hours spent on data entry and manual classification. Many users invest significant time and effort into data entry of bills or receipts and ensuring that each transaction is appropriately categorized.
Classifying expenses correctly is essential for meaningful reporting, and Receipt Bot applies advanced machine-learning techniques to categorize your transactions automatically. However, before the automatic categorization, uploading your chart of accounts to Receipt Bot is essential.
In this article, we will discuss how you can manage your chart of accounts in Receipt Bot for accurate assignment.
The following options are available related to managing the chart of account data in Receipt Bot;
- Sync chart of accounts from accounting software
- Manually add a category
- Import chart of accounts using CSV template
- Update details for existing accounts
Option 1 – Sync chart of accounts from accounting software
When you integrate a Receipt Bot business with Xero or QuickBooks Online, all your accounting categories (Chart of Accounts) are imported from your accounting software.
Following the relevant user guide, you can find more details on integrating a business with accounting software.
- If you need to connect to Xero, then follow this guide; Connect to Xero
- If you need to connect to QuickBooks Online, then follow this guide; Connect to QuickBooks Online
Receipt Bot does not allow updates to the chart of accounts when imported from an integrated accounting software.
Option 2 – Manually add a category
You can use Receipt Bot as a standalone tool for expense management; in this case, you can use the default chart of accounts created for you when you set up your business. To add custom categories to the default chart of accounts, please follow these steps;
Step 1 – Navigate to the “Chart of Accounts” page using the business navigation menu.
[imageframe lightbox=”yes” gallery_id=”” lightbox_image=”https://www.receipt-bot.com/assets/video/create-update-accounting-categories/slide-1.JPG” style_type=”none” bordercolor=”” bordersize=”0px” borderradius=”0″ stylecolor=”” align=”center” link=”” linktarget=”_self” animation_type=”0″ animation_direction=”down” animation_speed=”0.1″ animation_offset=”” class=”” id=””]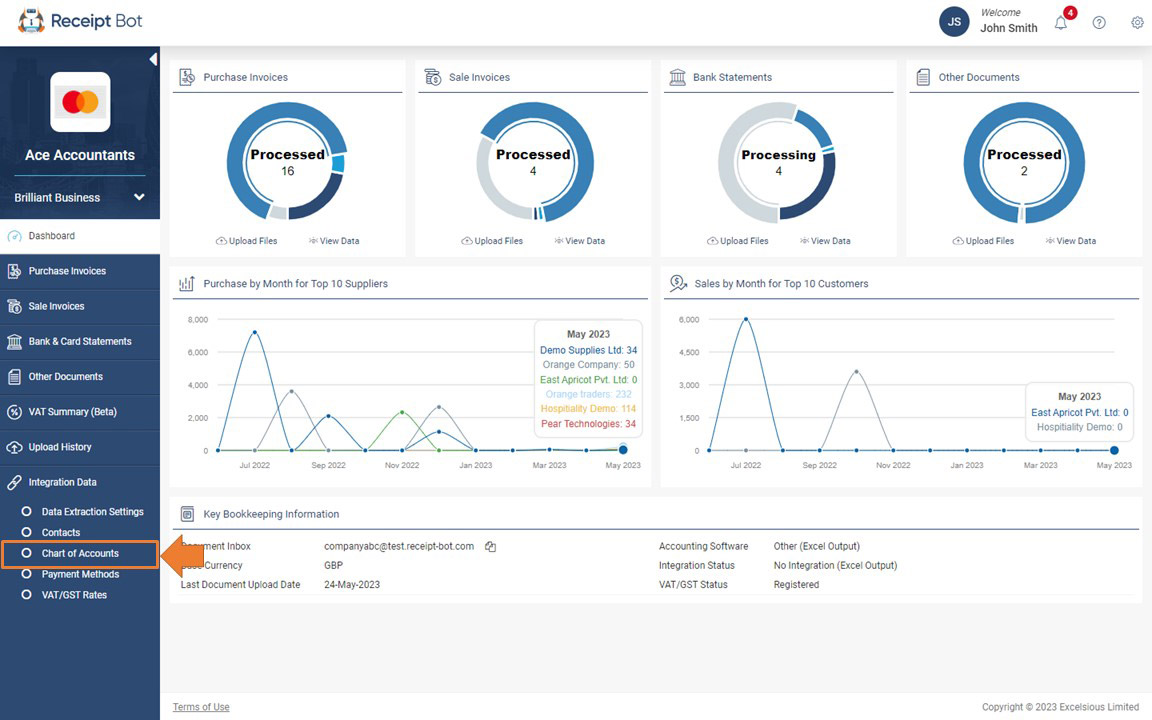 [/imageframe]
Step 2 – Click the “Add Category” button.
[imageframe lightbox=”yes” gallery_id=”” lightbox_image=”https://www.receipt-bot.com/assets/video/create-update-accounting-categories/slide-2.JPG” style_type=”none” bordercolor=”” bordersize=”0px” borderradius=”0″ stylecolor=”” align=”center” link=”” linktarget=”_self” animation_type=”0″ animation_direction=”down” animation_speed=”0.1″ animation_offset=”” class=”” id=””]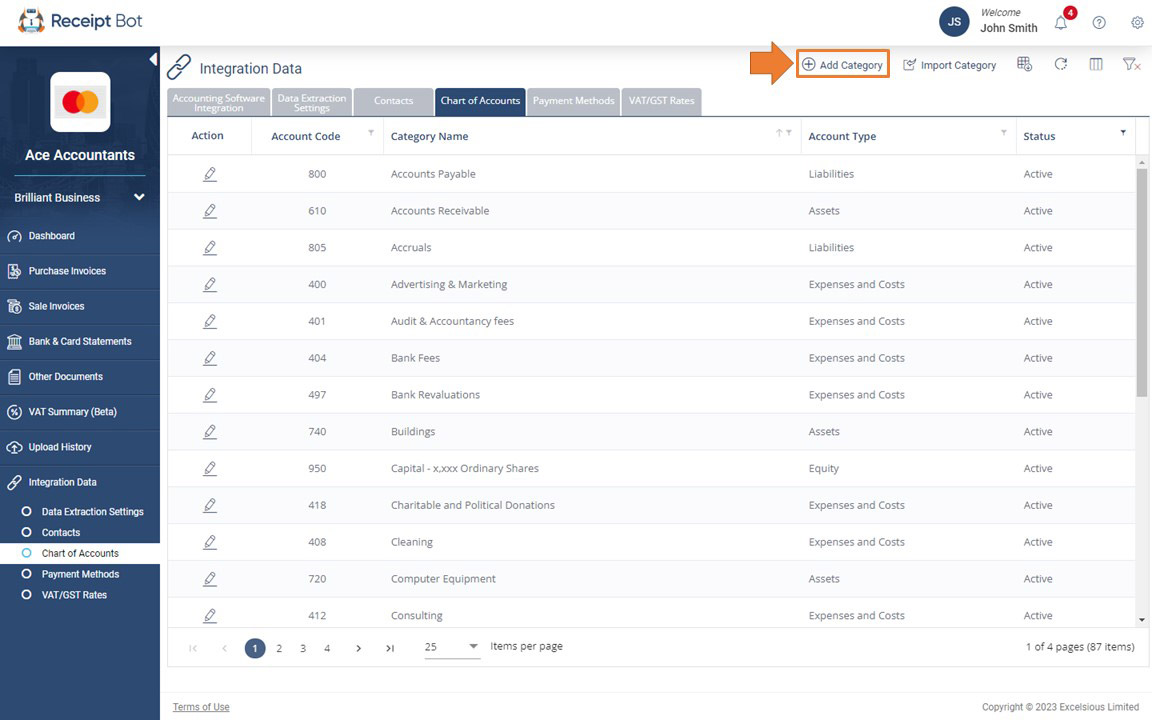 [/imageframe]
Step 3 – Enter the name, type and code for the category.
[imageframe lightbox=”yes” gallery_id=”” lightbox_image=”https://www.receipt-bot.com/assets/video/create-update-accounting-categories/slide-3.JPG” style_type=”none” bordercolor=”” bordersize=”0px” borderradius=”0″ stylecolor=”” align=”center” link=”” linktarget=”_self” animation_type=”0″ animation_direction=”down” animation_speed=”0.1″ animation_offset=”” class=”” id=””] [/imageframe]
Step 4 – Click the “Save” button to confirm changes.
[imageframe lightbox=”yes” gallery_id=”” lightbox_image=”https://www.receipt-bot.com/assets/video/create-update-accounting-categories/slide-4.JPG” style_type=”none” bordercolor=”” bordersize=”0px” borderradius=”0″ stylecolor=”” align=”center” link=”” linktarget=”_self” animation_type=”0″ animation_direction=”down” animation_speed=”0.1″ animation_offset=”” class=”” id=””]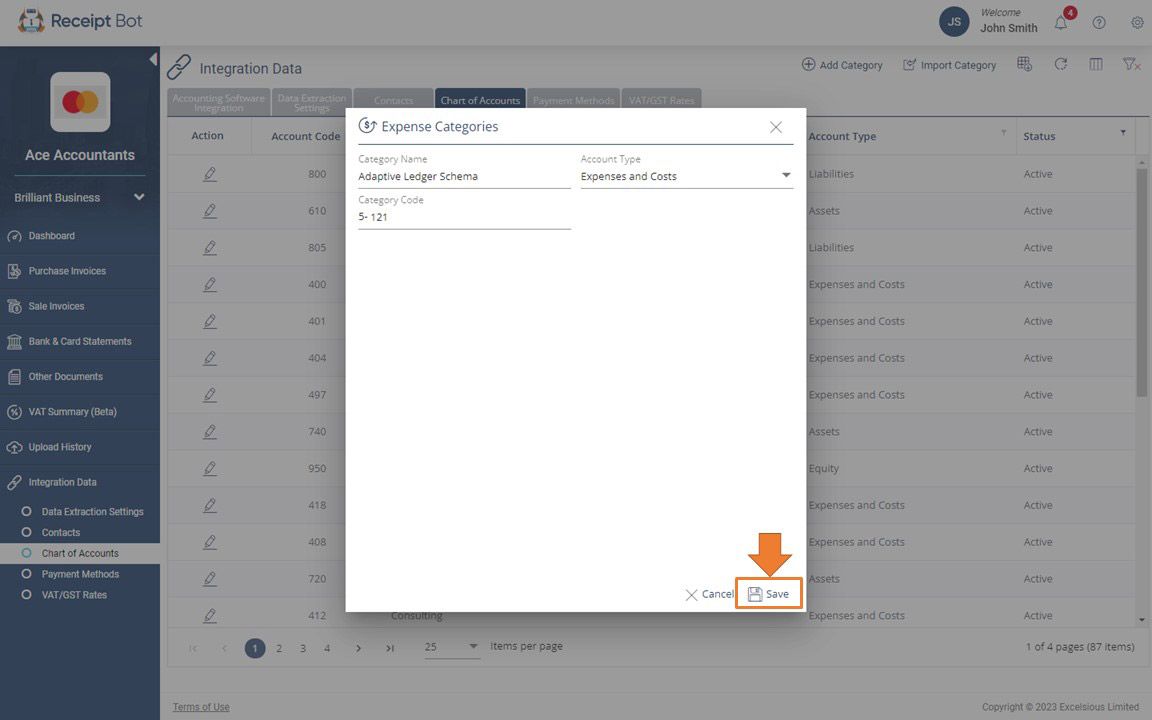 [/imageframe]
Your new category should be added now.
Option 3 – Import chart of accounts using a CSV template
If you already have a complete chart of accounts and want to use it instead of the default COA. You can import it by following these steps using a CSV template;
Step 1 – Navigate to the “Chart of Accounts” page using the business navigation menu.
[imageframe lightbox=”yes” gallery_id=”” lightbox_image=”https://www.receipt-bot.com/assets/video/create-update-accounting-categories/slide-1.JPG” style_type=”none” bordercolor=”” bordersize=”0px” borderradius=”0″ stylecolor=”” align=”center” link=”” linktarget=”_self” animation_type=”0″ animation_direction=”down” animation_speed=”0.1″ animation_offset=”” class=”” id=””][/imageframe]
Step 2– – Click the ‘Import Category’ button.
[imageframe lightbox=”yes” gallery_id=”” lightbox_image=”https://www.receipt-bot.com/assets/video/create-update-accounting-categories/slide-5.JPG” style_type=”none” bordercolor=”” bordersize=”0px” borderradius=”0″ stylecolor=”” align=”center” link=”” linktarget=”_self” animation_type=”0″ animation_direction=”down” animation_speed=”0.1″ animation_offset=”” class=”” id=””]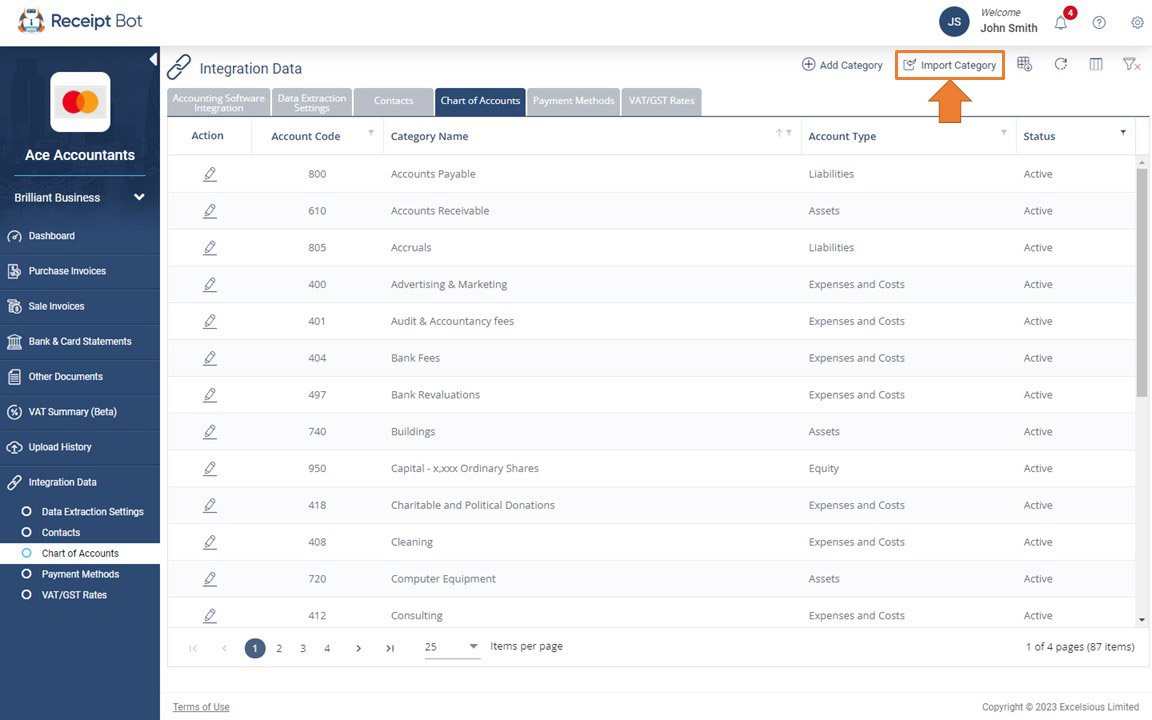 [/imageframe]
Step 3 – Download the Category Import template.
[imageframe lightbox=”yes” gallery_id=”” lightbox_image=”https://www.receipt-bot.com/assets/video/create-update-accounting-categories/slide-6.JPG” style_type=”none” bordercolor=”” bordersize=”0px” borderradius=”0″ stylecolor=”” align=”center” link=”” linktarget=”_self” animation_type=”0″ animation_direction=”down” animation_speed=”0.1″ animation_offset=”” class=”” id=””]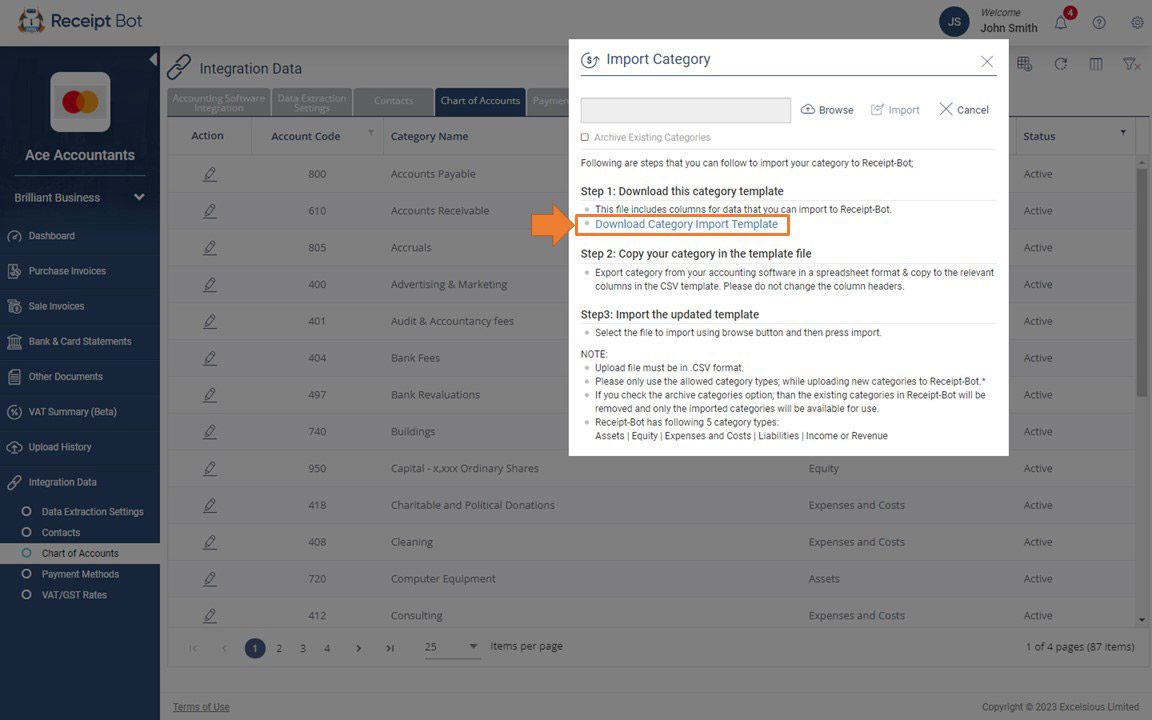 [/imageframe]
Step 4 – Paste your chart of account to the downloaded CSV template.
The following data must be provided in the template;
- Code
- Category Name
- Account Type
Following is a list of the allowed values for the “Account types” column:
- Assets
- Liabilities
- Equity
- Income and Revenue
- Expenses and Costs
[imageframe lightbox=”yes” gallery_id=”” lightbox_image=”https://www.receipt-bot.com/assets/video/create-update-accounting-categories/slide-7.JPG” style_type=”none” bordercolor=”” bordersize=”0px” borderradius=”0″ stylecolor=”” align=”center” link=”” linktarget=”_self” animation_type=”0″ animation_direction=”down” animation_speed=”0.1″ animation_offset=”” class=”” id=””]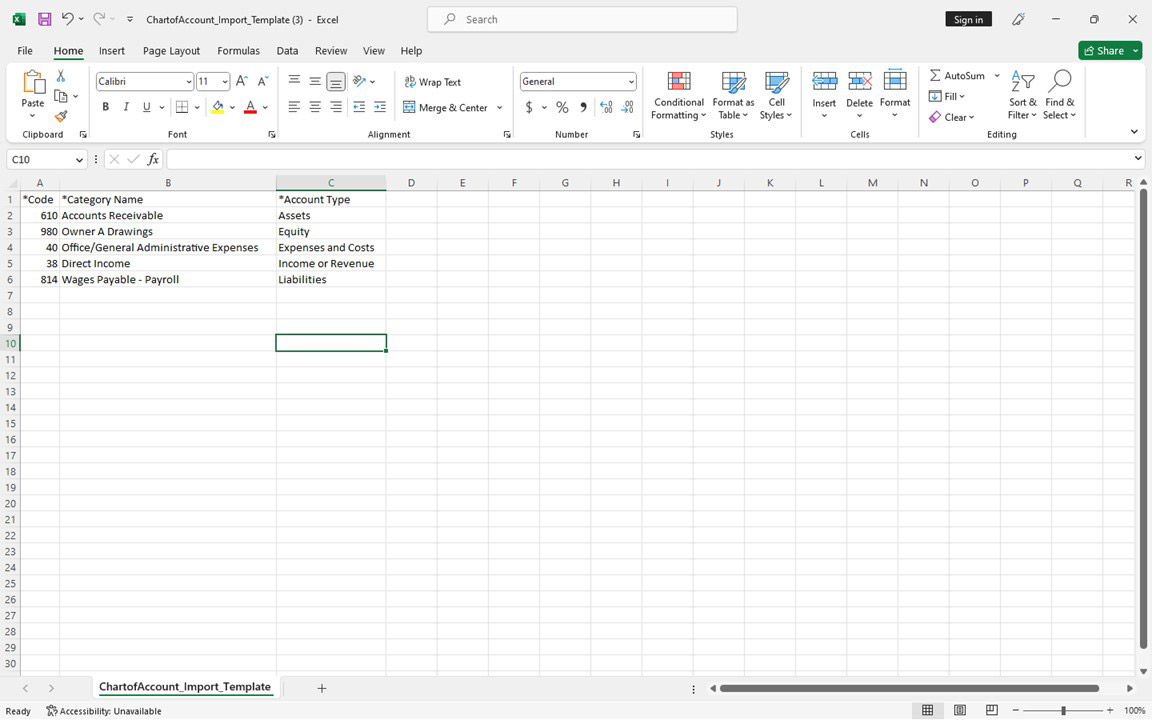 [/imageframe]
Step 5 – Click the “Browse” button and select the CSV file.
The system will validate your list for the following checks;
- All fields are populated in each row.
- There are no duplicate values based on the Code or Category name.
[imageframe lightbox=”yes” gallery_id=”” lightbox_image=”https://www.receipt-bot.com/assets/video/create-update-accounting-categories/slide-8.JPG” style_type=”none” bordercolor=”” bordersize=”0px” borderradius=”0″ stylecolor=”” align=”center” link=”” linktarget=”_self” animation_type=”0″ animation_direction=”down” animation_speed=”0.1″ animation_offset=”” class=”” id=””]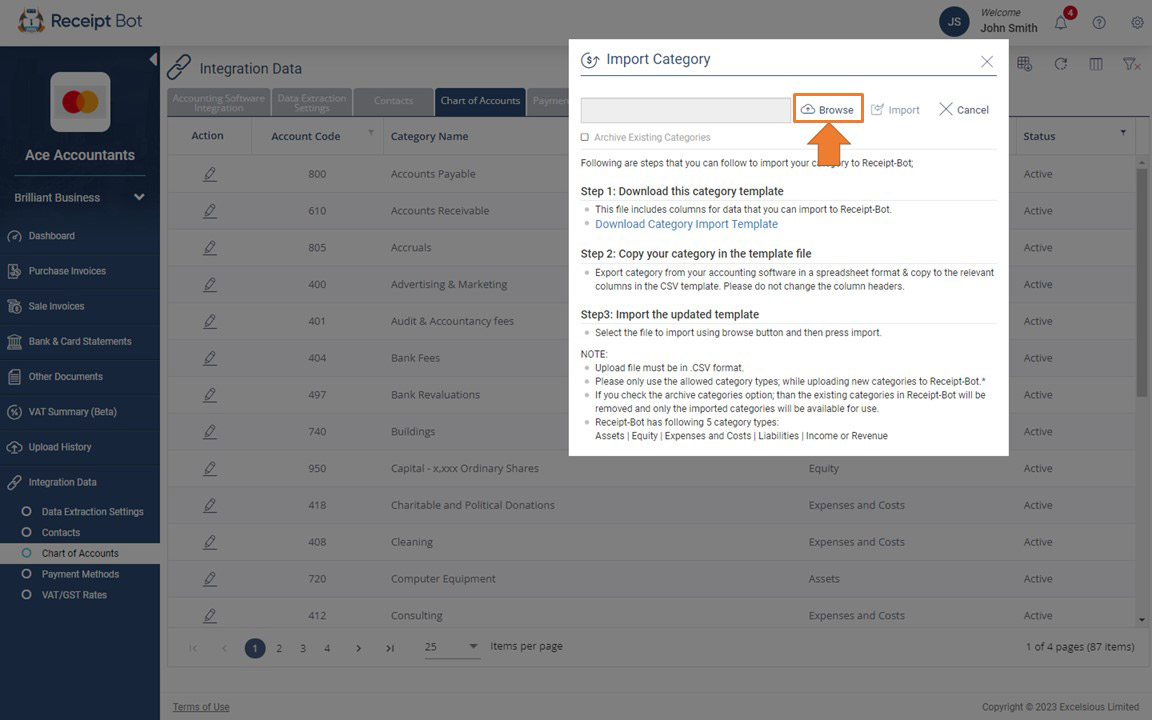 [/imageframe]
Step 6 – Check the “Archive Existing Categories” option if importing a new set of categories and want to archive the default ones.
[imageframe lightbox=”yes” gallery_id=”” lightbox_image=”https://www.receipt-bot.com/assets/video/create-update-accounting-categories/slide-9.JPG” style_type=”none” bordercolor=”” bordersize=”0px” borderradius=”0″ stylecolor=”” align=”center” link=”” linktarget=”_self” animation_type=”0″ animation_direction=”down” animation_speed=”0.1″ animation_offset=”” class=”” id=””]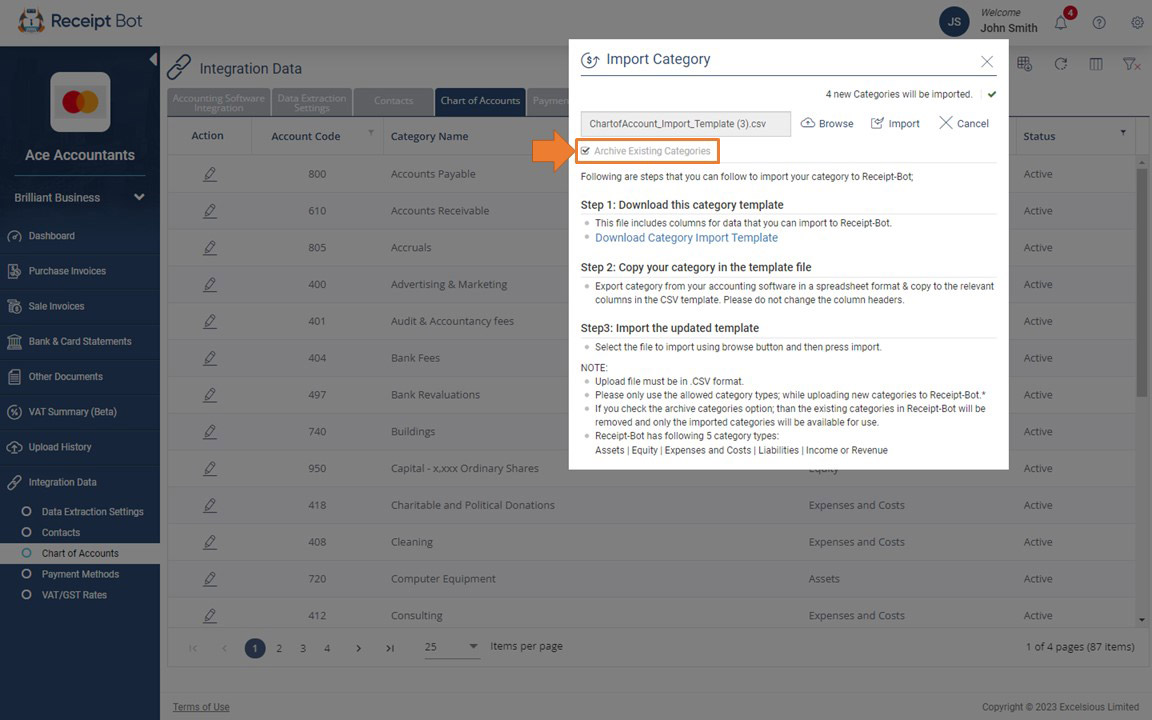 [/imageframe]
Step 7 – Click the ‘Import’ button to start the import process
[imageframe lightbox=”yes” gallery_id=”” lightbox_image=”https://www.receipt-bot.com/assets/video/create-update-accounting-categories/slide-10.JPG” style_type=”none” bordercolor=”” bordersize=”0px” borderradius=”0″ stylecolor=”” align=”center” link=”” linktarget=”_self” animation_type=”0″ animation_direction=”down” animation_speed=”0.1″ animation_offset=”” class=”” id=””]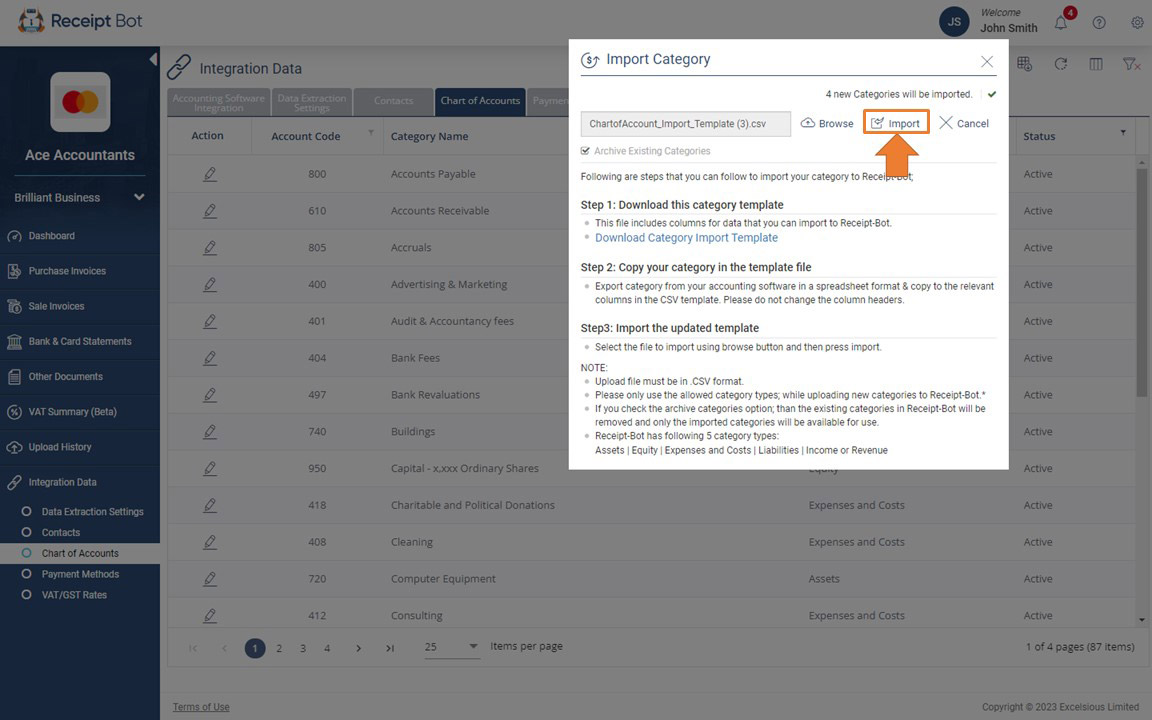 [/imageframe]
Step 8 – Click the “Finish” button.
[imageframe lightbox=”yes” gallery_id=”” lightbox_image=”https://www.receipt-bot.com/assets/video/create-update-accounting-categories/slide-11.JPG” style_type=”none” bordercolor=”” bordersize=”0px” borderradius=”0″ stylecolor=”” align=”center” link=”” linktarget=”_self” animation_type=”0″ animation_direction=”down” animation_speed=”0.1″ animation_offset=”” class=”” id=””]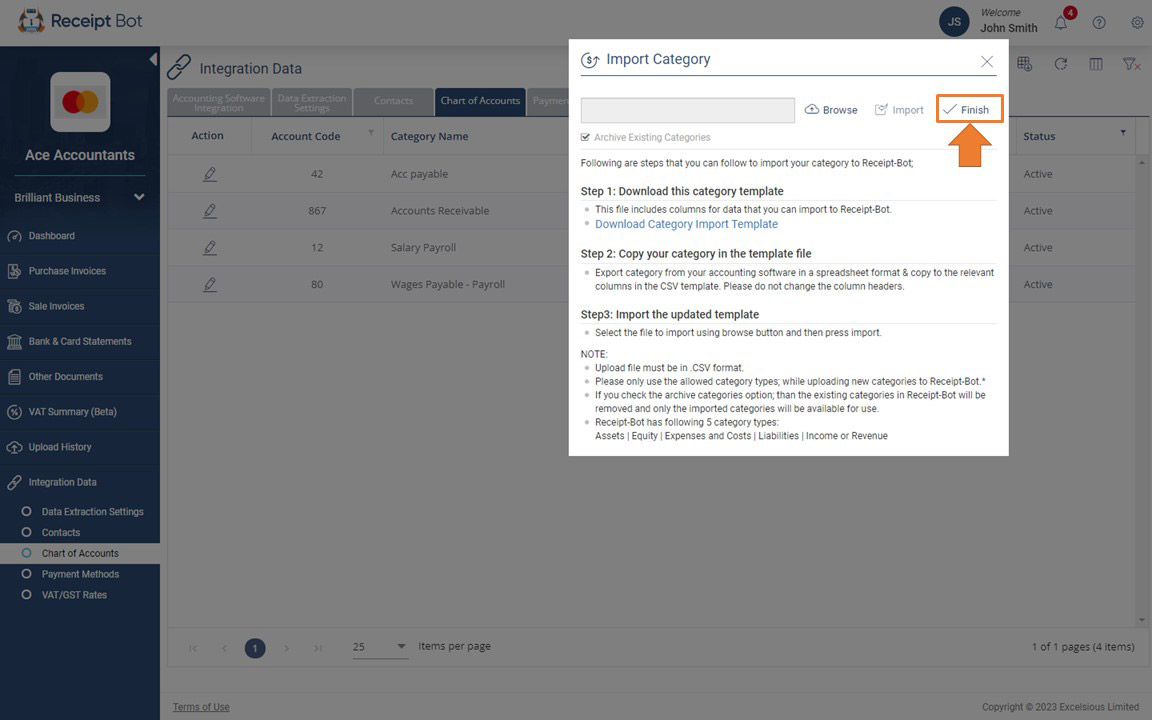 [/imageframe]
Your chart of accounts should now be imported and available for use in the Receipt Bot app.
Option 4 – Update details for existing accounts
Step 1 – Navigate to the “Chart of Accounts” page using the business navigation menu.
[imageframe lightbox=”yes” gallery_id=”” lightbox_image=”https://www.receipt-bot.com/assets/video/create-update-accounting-categories/slide-1.JPG” style_type=”none” bordercolor=”” bordersize=”0px” borderradius=”0″ stylecolor=”” align=”center” link=”” linktarget=”_self” animation_type=”0″ animation_direction=”down” animation_speed=”0.1″ animation_offset=”” class=”” id=””][/imageframe]
Step 2 – Navigate to the “Edit” icon for the relevant category.
[imageframe lightbox=”yes” gallery_id=”” lightbox_image=”https://www.receipt-bot.com/assets/video/create-update-accounting-categories/slide-12.JPG” style_type=”none” bordercolor=”” bordersize=”0px” borderradius=”0″ stylecolor=”” align=”center” link=”” linktarget=”_self” animation_type=”0″ animation_direction=”down” animation_speed=”0.1″ animation_offset=”” class=”” id=””]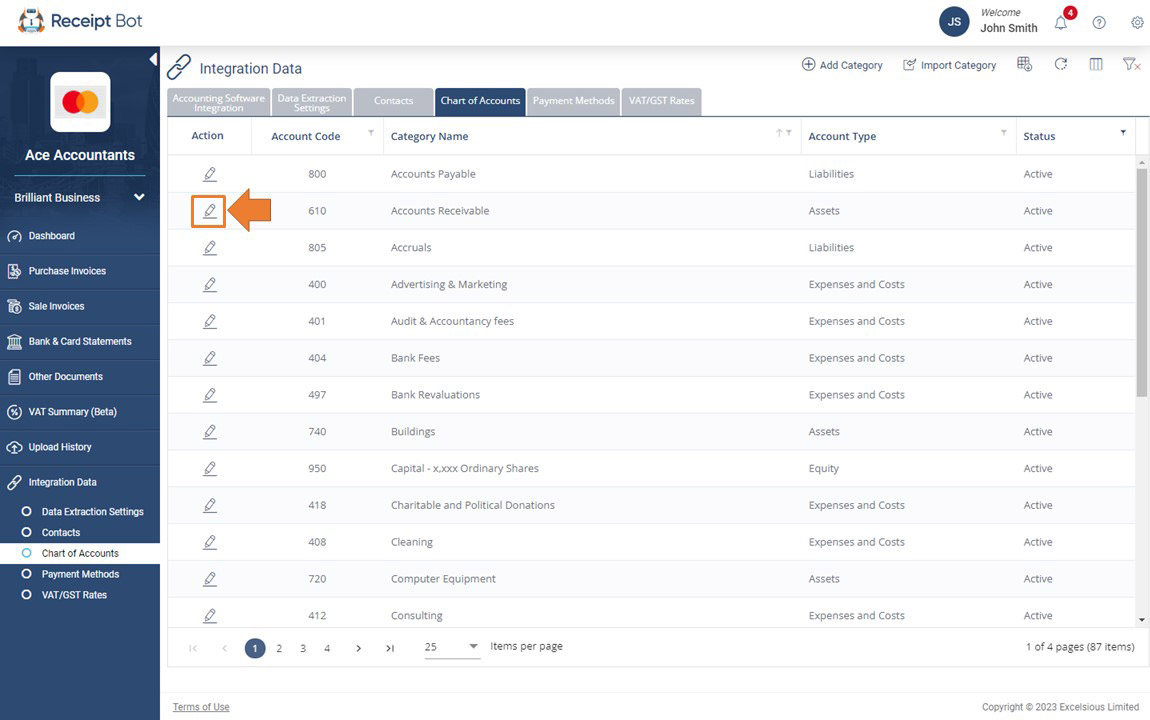 [/imageframe]
Step 3 – Update the category name or account type, or code.
You can also update the status to Archive”, which will disable using that category on any future documents.
[imageframe lightbox=”yes” gallery_id=”” lightbox_image=”https://www.receipt-bot.com/assets/video/create-update-accounting-categories/slide-13.JPG” style_type=”none” bordercolor=”” bordersize=”0px” borderradius=”0″ stylecolor=”” align=”center” link=”” linktarget=”_self” animation_type=”0″ animation_direction=”down” animation_speed=”0.1″ animation_offset=”” class=”” id=””]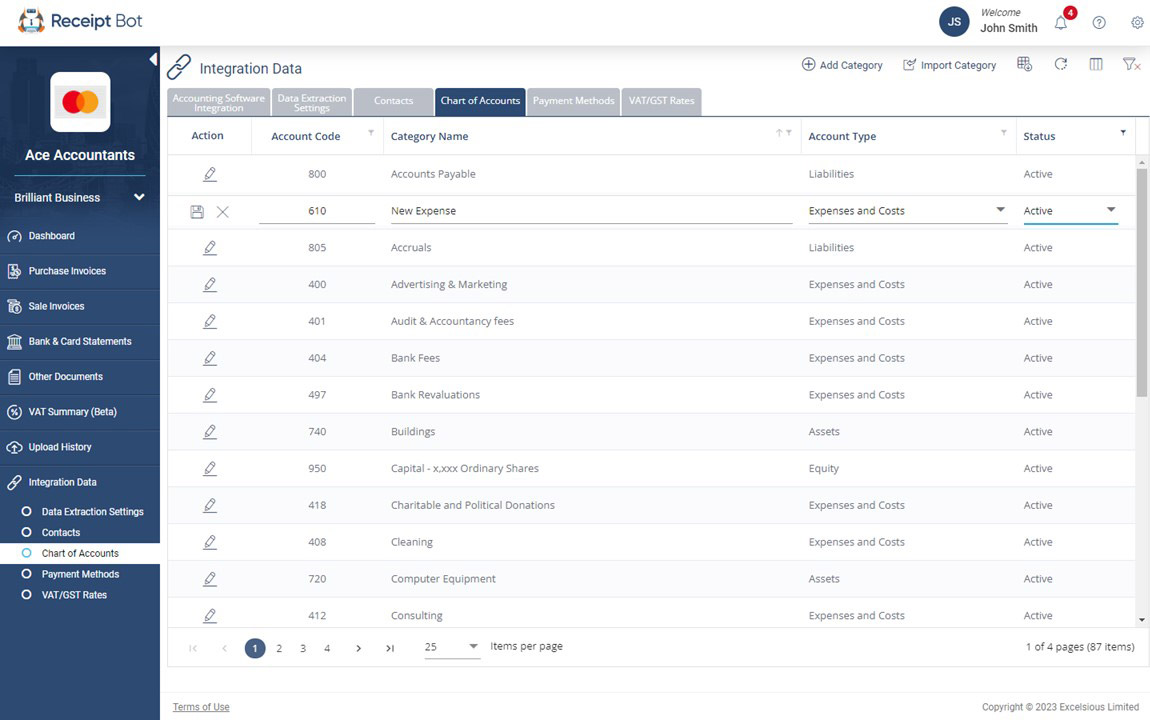 [/imageframe]
Step 4 – Click the “Save” icon to apply the changes.
[imageframe lightbox=”yes” gallery_id=”” lightbox_image=”https://www.receipt-bot.com/assets/video/create-update-accounting-categories/slide-14.JPG” style_type=”none” bordercolor=”” bordersize=”0px” borderradius=”0″ stylecolor=”” align=”center” link=”” linktarget=”_self” animation_type=”0″ animation_direction=”down” animation_speed=”0.1″ animation_offset=”” class=”” id=””]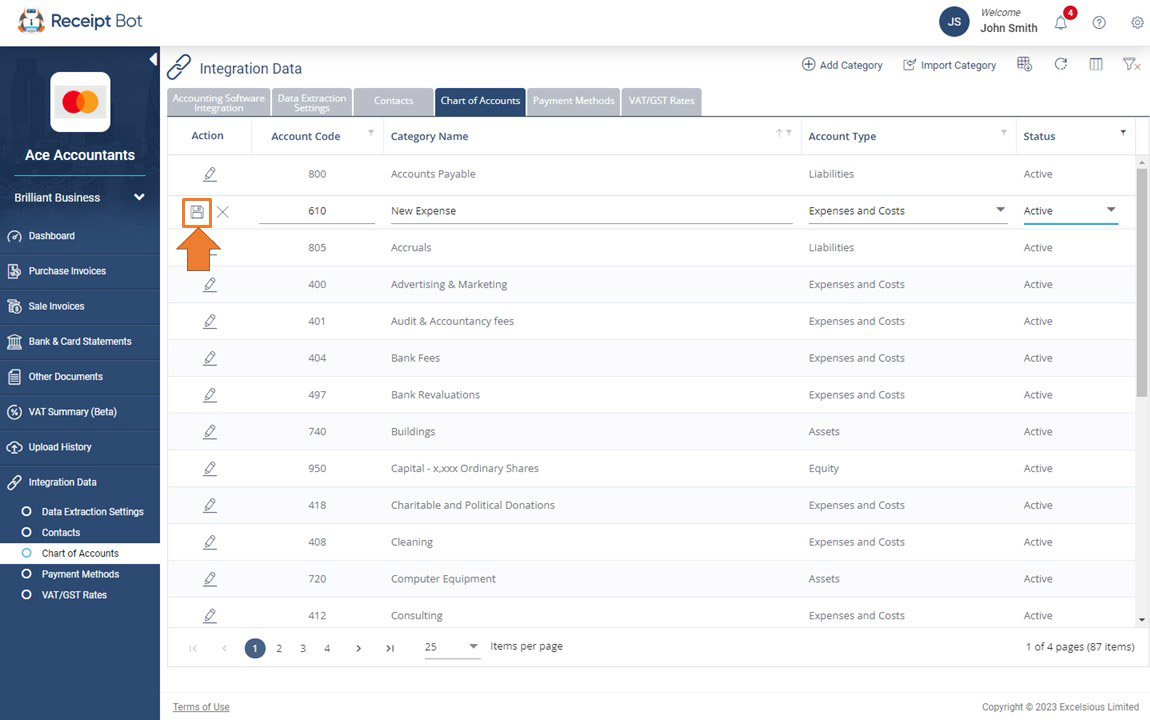 [/imageframe]
Your category should be updated now.
Limitations in mobile Receipt Bot apps
Receipt Bot has no feature-related add or update of chart of accounts from the Receipt Bot mobile apps. If you need to perform such changes, you need to use the web.
Next Step: Managing payment methods in Receipt Bot
As you have set up your chart of accounts in Receipt Bot, the next step should be to get your payment methods finalized in Receipt Bot so that the appropriate payment method gets linked to the processed document. Create and update payment methods